Want to buy or sell something? Check the classifieds
  • The Fedora Lounge is supported in part by commission earning affiliate links sitewide. Please support us by using them. You may learn more here.

Sewing Lessons & FAQ

Laughing Magpie

One of the Regulars
Messages
123
Location
Canada
You're right, Rachel, sometimes for fitting you've got to plan a bit more if you do zippers first, and sometimes linings, facings or other issues get in the way of doing the closure first.

Though sometimes I squeak by, if I'm being lazy, with fitting after the zipper by adjusting darts or the other long seams (center seams if the zipper is on the side, sides if the zipper is on the center.)

Several of my vintage sewing and tailoring books earnestly instruct on the virtues of doing as many of your details - closures, trim, pockets, etc - first, so that you've got the benefit of sewing on flat pieces mostly. This assumes you've carefully drafted and fitted and marked everything, so it's not something I manage to do very often. :)

Jen
 

Lady Day

I'll Lock Up
Bartender
Messages
9,087
Location
Crummy town, USA
Laughing Magpie said:
Several of my vintage sewing and tailoring books earnestly instruct on the virtues of doing as many of your details - closures, trim, pockets, etc - first, so that you've got the benefit of sewing on flat pieces mostly. This assumes you've carefully drafted and fitted and marked everything, so it's not something I manage to do very often. :)

Jen

This is so true! lol I did this, trusting my great vintage books, when I first began sewing, but wondered why my pockets had 1" differences in hight from one another! :rage:

So I just stopped, and only if it involved constructing something on the seam, only then would it get done prior to regular construction.

Oh well. :eek:

LD
 

ShoreRoadLady

Practically Family
Here's my hint for invisible zippers (I hate regular zippers), suggested to me by someone else when I had trouble. It worked like a charm. It's probably non-period, but hey, if it saves me some agony, I'm all for it!

Interace the zipper area. I use fusible tricot interfacing. All you need is a thin strip, perhaps 1/2-5/8" wide and a little past the length of your zipper. You want the seamline to be stabilized, so center it along the seamline and fuse. The fabric won't stretch out of shape, and it's a cinch to sew.

My other tip (again, for invisible zippers only) is to trim down the seam allowance so you can just line up the zipper tape to the edge and sew. No extensive pinning needed. Invisible zipper tape usually has a 3/8" allowance, so I trim 1/4" from a 5/8" seam.
 

ShoreRoadLady

Practically Family
Lauren said:
HA! True! Invisible zippers are my friends. If you can't see it, it's not un-period, right? (is un-period even a word?). There's a special invisible zipper foot for my machine that makes it nearly brainless, but I couldn't do it for the life of me without one. I'd say look into it if you want to put them in!

Maybe this belonged in my other post in the Sewing FAQ, but oh well. :) You *can* put in invisible zippers without an invisible zipper foot. I found this out the hard way after the Coats & Clark zipper foot would not work with my machine. :rage: You just have to press the zipper out really flat and stitch carefully, close to the teeth, with a regular zipper foot. It took a little while to master, but it works fine now.
 

Sunny

One Too Many
Messages
1,409
Location
DFW
ShoreRoadLady said:
Maybe this belonged in my other post in the Sewing FAQ, but oh well. :) You *can* put in invisible zippers without an invisible zipper foot. I found this out the hard way after the Coats & Clark zipper foot would not work with my machine. :rage: You just have to press the zipper out really flat and stitch carefully, close to the teeth, with a regular zipper foot. It took a little while to master, but it works fine now.
I, uh, haven't yet bothered to figure out the invisible zipper foot. What I do at present is baste by hand (no pinning! yay!) and sew with a piping foot.
 

Rachael

A-List Customer
Messages
465
Location
Stumptown West
I'm glad to hear there are other fans of the invisible zipper. Many of my friends are terrified of them so I do a lot of charitable zipper insertions.

I use them almost exclusively, since they go in so easily and are more flexible which means no ripples. Since they are applied before the rest of the seam, pinning isn't really needed as long as you take it slow and line up the top of the seam with the top of the tape. If inserting it at the waist in a formal dress, I notch the seam allowance to ensure both sides line up. I also use tricot for interfacing; figure if you interface buttonholes you should interface other closures. In a pinch, a bias strip of organdy works too. (is it obvious I do a lot of sewing after hours when I can't run to the store)

From my recollection of my great-aunts' formalwear, invisible zippers were used mid-century. Or perhaps they were just really well-made lapped plackets. Since my mom has all of those gowns, I am just guessing that they dated from late 40's to 60's. I should see if I could aquire that collection now that I think of it.
 

Lady Day

I'll Lock Up
Bartender
Messages
9,087
Location
Crummy town, USA
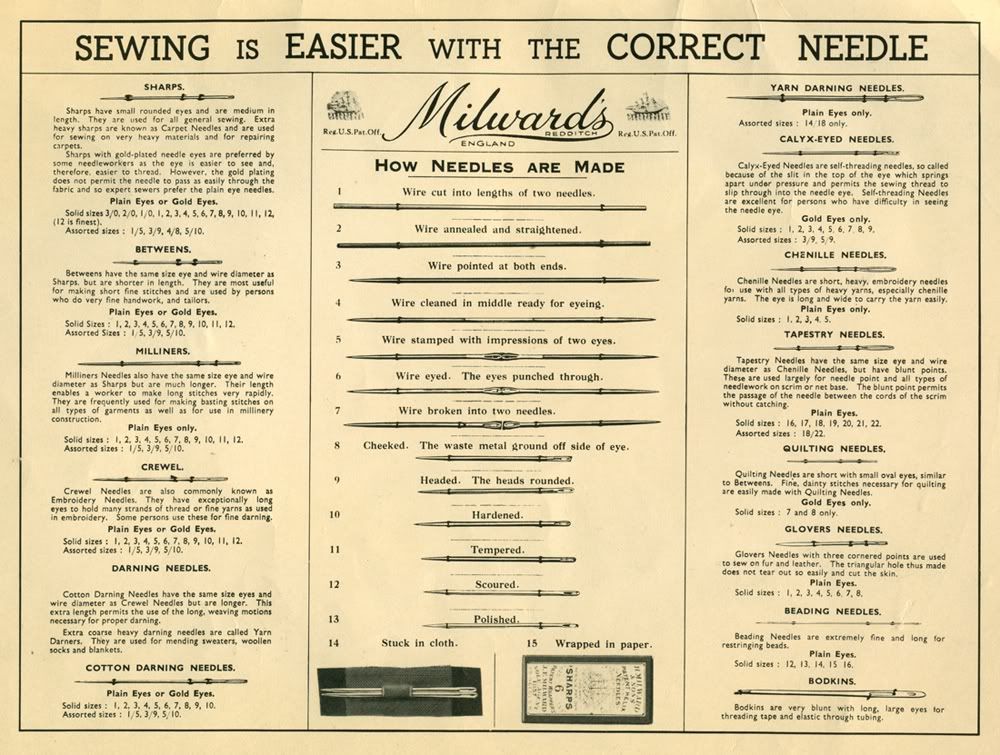
Here is the back page of my Sew and Save booklet I got. Im always in search of terminology and knowing what is for what.
Thought you gals might like it :)

needles.jpg


LD
 

Rachael

A-List Customer
Messages
465
Location
Stumptown West
that is a wonderful resource! I have an old book detailing trades, and had no idea how complex needle and pinmaking was. To think of how many I throw away in a year; it's rather sad.
 

Gigi

New in Town
Messages
46
Location
USA
I'm having a problem selecting the correct size pattern when buying authentic vintage patterns. I should wear a size 12 in vintage clothing items in general, as I wear a modern size 4-6, correct? I have some size 12 clothing from the 1950s. Yet, all the measurements for the vintage patterns that are size 12 are much smaller than my measurements (i.e. the pattern says 32 in. bust, when mine is 36). Sometimes this is frustrating as some patterns I look at only list the size and not the specific body measurements. If anyone here is a modern day 4-6 or has experience sewing for people of this size, what vintage pattern size should I get?
 

Sunny

One Too Many
Messages
1,409
Location
DFW
Gigi said:
I'm having a problem selecting the correct size pattern when buying authentic vintage patterns. I should wear a size 12 in vintage clothing items in general, as I wear a modern size 4-6, correct? I have some size 12 clothing from the 1950s. Yet, all the measurements for the vintage patterns that are size 12 are much smaller than my measurements (i.e. the pattern says 32 in. bust, when mine is 36). Sometimes this is frustrating as some patterns I look at only list the size and not the specific body measurements. If anyone here is a modern day 4-6 or has experience sewing for people of this size, what vintage pattern size should I get?
This has been discussed before, so here's just a thumbnail opinion. First, a "vintage" size 12 isn't one size: a 1920s 12 is smaller than a 1950s 12. Second, forget about size and focus on measurements - your conversion is off. In the 30s and 40s, bust 36 is size 18. In the 50s, a 16 would probably work; bust sizes change about 2" per size, so if a 12 is 32 inches, a 16 would be 36.

Modern sizes aren't a good basis for comparison. In modern clothes I'll wear anything from 4-8, but I'm a consistent 30s/40s size 16. Modern clothes tend to have a lot more ease than vintage, too. Depending on the pattern you may need to adapt things to your figure; my hips are 38, slightly too large for a 16, so I need to slightly enlarge some slimmer skirts. But vintage sizes are pretty darned consistent.
 

Mariposa625

New in Town
Messages
4
Location
Wyoming
Gigi said:
I'm having a problem selecting the correct size pattern when buying authentic vintage patterns. I should wear a size 12 in vintage clothing items in general, as I wear a modern size 4-6, correct? I have some size 12 clothing from the 1950s. Yet, all the measurements for the vintage patterns that are size 12 are much smaller than my measurements (i.e. the pattern says 32 in. bust, when mine is 36). Sometimes this is frustrating as some patterns I look at only list the size and not the specific body measurements. If anyone here is a modern day 4-6 or has experience sewing for people of this size, what vintage pattern size should I get?


Try this forum. The first post has great info on vintage sizes.
 

MissAmelina

A-List Customer
Messages
413
Location
Boise, ID
full bust stuff

Sooo....I need to make an FBA to a dress that has a gathered bodice at both the top (where is attaches to a yoke) and the bottom (where it attaches to a somewhat raised waistline). Here is a pic of the pattern image:

FBAtodress.jpg


I made a muslin and tried it on, and saw the gathers were spreading too much across the bust. Everything else fits perfectly.

I took my seam ripper and carefully ripped straight down over the bust about an inch into the gathering closest the armpit. The muslin spread apart (sprang apart is more like it! haha) about an inch or so at the fullest part of my bust.

Do I just need to add an inch or two to the gathered area of the bodice on the pattern? That way the boobage has more room, right? It makes more sense to slice and spread the pattern, adding the extra space into the gathering, than spread the pattern from the shoulder as seen in some FBA's. That way, I would not have to futz with resizing any of the other pattern pieces, such as the yoke.

I am searching thru my vintage sewing manuals and having a heck of a time. Common sense tells me that is all I would have to do. But i guess I just wanted to ask you ladies since I am still learning.

Many of my patterns have gathering over the bust area and this seems like an easy fix.
Any and all input would be swell!
Thank ya!!!
 

Lady Day

I'll Lock Up
Bartender
Messages
9,087
Location
Crummy town, USA
That could work but dont just think of the adjustment as horizontal, you may also need to make a vertical adjustment of 1/2" or so.

Just a thought. :)

LD
 

MissAmelina

A-List Customer
Messages
413
Location
Boise, ID
The initial adjustment is a vertical one (up and down, right?) spreading the pattern from left to right....oh wait....which would make it horizontal. Now I understand...sorry....i am a visual person. :) hehe. I get what you mean. I will make adjustments in both directions and post my results in the next couple days!
Thanks, LD! You da bomb.
 

KittyT

I'll Lock Up
Messages
4,463
Location
Boston, MA
I don't normally follow this thread, so it's highly likely that someone has posted this here already, but my mom showed me the coolest way to do darts (works for straight darts only, not curved ones)!

Before, I was tracing the pattern markings using chalk and a wheel. She had me make a small notch at each end of the bottom of the dart and a tailor's tack at the point. Bring the notches together and pin the dart together as you normally would. Pull out your bobbin thread and lay the thread in a straight line from the notches at the bottom of the dart to the tip of the dart. Then all you have to do is sew along the thread as you hold it. Much easier than tracing out the whole thing!
 

MarieAnne

Practically Family
Messages
555
Location
Ontario
Sewing pattern ease

Does anyone else find that the ease added to sewing patterns is ridiculous. I buy patterns that are a tiny bit smaller than my size, and when I fit them, I end up taking off 3 inches EASY. How do you guys deal with it? Do you buy smaller patterns?

The skirt I am making now, has a center front seam and center back seam. I've had to take so much off the seams that my dart placement is less than optional. My pencil skirt has a kangaroo pouch! I just want to throw it out and start over.:rage:
skirt.jpg

I am making the middle skirt in a fabulous slightly stretchy leopard print.
 

ShoreRoadLady

Practically Family
I've definitely encountered the problem with modern patterns, but I would think a vintage pattern would be closer to the listed measurements.

Sometimes, overfitting can cause weird pouching and straining. Maybe you just needed to take in the waist, and you took in the hips too much? Or perhaps the darts just need repositioning; your shape may not fit the model 50s shape. BTW, I'd recommend taking from the side seams first, instead of the center front and back seams.
 

Miss 1929

My Mail is Forwarded Here
Messages
3,397
Location
Oakland, California
This goes in the Sewing FAQs thread...but...

Pouch sometimes happens when the darts are too darted, letting them out helps. Sometimes they need to be moved too. Did you make a muslin?
And re the ease - keep in mind that if you are a smaller size, you would have a bigger percentage of ease to remove than a larger size would. For instance, if you are a 34" hip, and you need to remove 3", that's a lot more percentage than 3" would be on a 48" hip.
It sounds as if probably your pattern is too big to begin with. And you might be buying them by size, rather than by measurements. Pattern sizes fluctuate wildly from decade to decade, company to company, so never go by the size. I am anywhere from a 12 to a 20 depending on how they size it.
So if you are 3" over, it sounds like you are buying them at least a size too big, maybe as much as 4 sizes too big. The details of the garment will be in weird places too if the size is way off, much redrafting is necessary to take things down or up more than one size.
 

Forum statistics

Threads
109,259
Messages
3,077,463
Members
54,183
Latest member
UrbanGraveDave
Top