Want to buy or sell something? Check the classifieds
  • The Fedora Lounge is supported in part by commission earning affiliate links sitewide. Please support us by using them. You may learn more here.

Photos of hatters tools

airforceindy

One of the Regulars
Messages
263
Location
Anchorage, AK
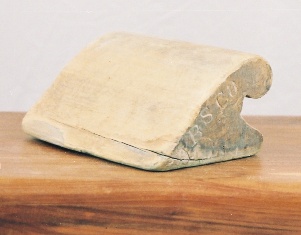
I did a search for 'tollicker', which didn't turn up much. The best thing I came up with was a pic on Jimmy Pierce's site of an old one he has for sale. Are there any other photos out there of vintage hatter's tools like this? If I can make them myself I will; but I need to know what I need first. So far I've narrowed it down to blocks, flanges, a tollicker, the obvious irons, and an adjustable brim jack (trimmer).

Regards, Andy
 

fletch31

Familiar Face
Messages
73
Location
Rexburg, ID
Get a copy of the Scientific Hat Making book if you haven't already. Its on OFAS for about 12 bucks. If your making hats by hand you don't need much more than what you have listed outside of a spinner, hat brushes, a good steam source, some puller downs and runner downs maybe in addition, know how to tie a hatters/slip knot, hand sew a lock stitch, and fold and sew on a ribbon. With these basics and the ones you have listed, you are ready to start messing around. Curling shackles for pencil curls are nice to have if you want them. Jim at JW hats can sell you a new set of 3 to cover the sizes for $300. They just make that job easier if you making hats with curled brims though and not used often with most fedora styles. I would say you could get buy without an official tolliker though. The edge of an old fashioned, heavy non-steam electric iron works just as well. Tollikers are going for crazy money on OFAS and are just nice to have but not absolutely necessary as you can get the same function in other ways. Last one I watched went for more than 250 bucks. You can have one made at a foundry for less than that. You can make one out of wood as well for getting a good brim break. You can get a new rounding jack for 175.00 at B&L in Oregon. I picked one up myself a while ago from her though it seems very easy to make one if you wanted to. If you have a wood shop on base I would make it yourself. There is not much to them and they are overpriced for what they are in my book. Very simple design. Marc Kitter made his own and some other guy on here that I cant recall. You could make a traditional one like the one I've got very easily I think. I have been gearing up myself over the last few months for hand made hatmaking. PM me if you want to chat more in depth. There are others here that could be of help as well.
Fletch31
 

fletch31

Familiar Face
Messages
73
Location
Rexburg, ID
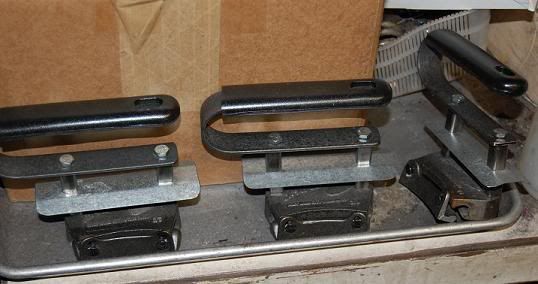
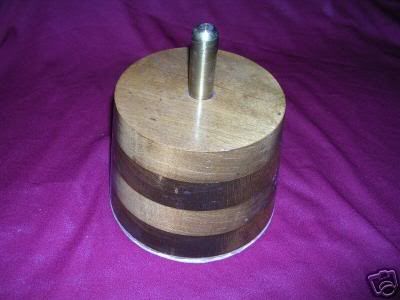
Here are a couple of pics I have handy of some tools and such. The spinner and initialer are some recent acquisitions of mine. I have some with wooden pegs but thought this brass peg one would be nice. The tolliker was that one on ebay that went for too much money and the curling shackles are some of JW's. I can take pics of more of my stuff but will give others an opportunity to do so.

Tolliker

tolliker.jpg


Curling Shackles

Shacklesresized.jpg


Spinner

spinner.jpg


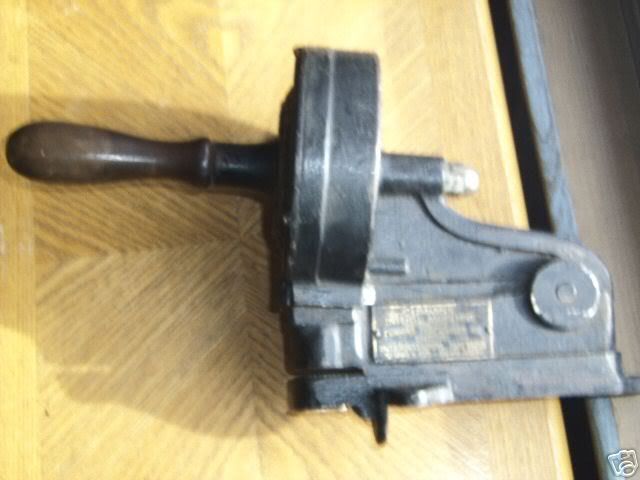
Something cool I just got. An antique perforated sweatband initialer. Steve Delk has one similar as I had him use it on my AB I bought from him a couple of years ago.

CumminsInitialPerforator.jpg
 

fletch31

Familiar Face
Messages
73
Location
Rexburg, ID
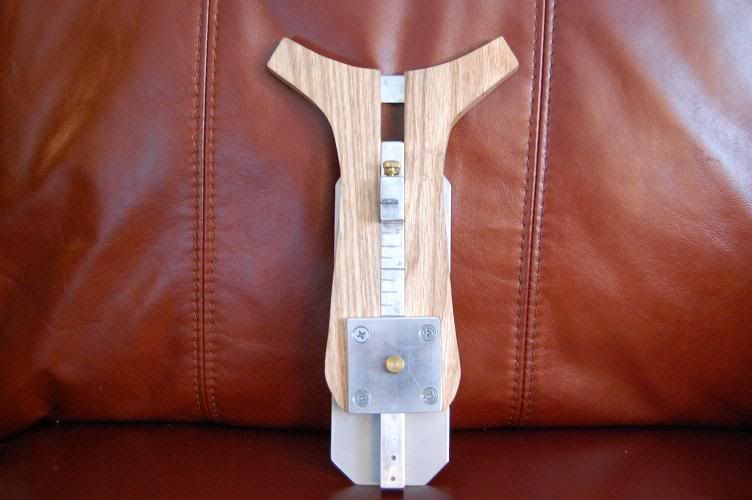
I snagged a pic of my rounding jack. Pretty simple design. I have seen them with knobs to adjust a metal band lining the curved area to change the radius for dimensional brim cutting. I'm modding this one to do that. I think they could be made rather easily overall. This one just uses exacto blades.

RoundingJack.jpg
 

Spatterdash

A-List Customer
Messages
310
Betty, thank you. That hat gauge is cool, but I'm needing some clarity on it's numbers.

I thought that if you wore a hat that measured 7 3/4 in American size, that meant that the length of your hat oval, or opening, was 7 3/4 inches from front to back.

According to that hat gauge, my hats should measure 8 1/2 inches from front to back and 7 from side to side.

Am I misreading that thing?
 

airforceindy

One of the Regulars
Messages
263
Location
Anchorage, AK
Thank you all for posting the images thus far! Fletch, that's some great info to know, thank you. The tollicker in your photo appears to be made of iron or steel. Does that indicate that it should be heated like a vintage iron for use? Also, what exactly to you mean by "puller-downs" and "runner-downs"? I looked closely at that one picture of Jim's workbench that you posted and couldn't figure out what it was that you were talking about. I'll be PM-ing soon to discuss some more. Betty, I have nearly the same question as Spatterdash: is that gauge set up for Regular Oval dimensions? Obviously, there would be some variation as you get into LO, and XLO shapes, just wondering.

Thanks again and keep 'em coming!
Regards, Andy
 

Vintage Betty

My Mail is Forwarded Here
Messages
3,300
Location
California, USA
Here's more tools and dry goods from my collection. I think this is an excellent idea for a thread, so I hope you'll forgive me if I respond broadly to term "hat tool" to include non-hand tools and materials, so we all have a thread we can look to for pictures.

I'll respond to the inquiry later tonight about the hat measuring tool. In the meantime, here's some more pictures to keep you reading:

Antique Millinery Ribbon

ribbon3.JPG

ribbon_lot1.jpg
ribbon_lot2.jpg


Antique Felting Tool (To make leaves for ladies hats)

millinery_tool1.JPG


1920's Millinery Tools for Flower Making
*Sorry, haven't had time to clean these up yet

millinery_tool2.JPG


More coming...
 

Art Fawcett

Sponsoring Affiliate
Messages
3,717
Location
Central Point, Or.
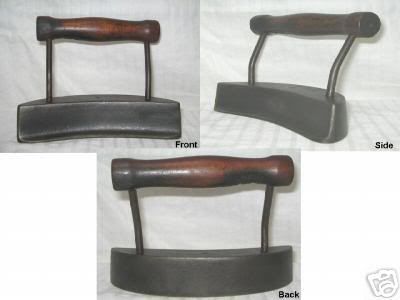
Fletch, the first picture you show aren't tollikers, they are brim irons. That's why the price was so high. Tollikers come in very differnt forms, but almost always wood. I'll try to post some pics tonight after I shut the shop down.

EDIT: I mistyped on the type of iron Fletch, I meant to say brim Iron, changed it.
 

airforceindy

One of the Regulars
Messages
263
Location
Anchorage, AK
2341251159_ca0a1fe062_o.jpg


This is the only picture I found of a tollicker, on Jimmy Pierce's site. Thanks for the correction, Art.

Betty, keep those pics comin', the more the merrier!

Andy
 

Vintage Betty

My Mail is Forwarded Here
Messages
3,300
Location
California, USA
Here ya go, Andy:

What else do you need to make a hat?

Hat Blocks and Accessories:

(Left to right: 1800's? Hat Block, 1920's Balsa Hat Block in Cloche Design, Custom Made Hat Block to my head size out of 4 wood posts, standard wig form with canvas overlay, 1970's polyester hat band, vintage straw, 1800's doll millinery hat blocks**, 1920's antique brim cutter and antique spinner.

millinery_tool3.JPG

**I purchased the antique doll hat blocks specifically to not waste materials once I am ready to try out my hand at millinery. I want to try small prototypes of my ideas first.

Closeup of the antique doll millinery blocks and brim cutter

millinery_tool4.JPG


Hat Displays:

(Left to right: modern blown glass, 2 wood spindles, 1920's hand painted hat display)

millinery_tool5.JPG


Hat Books

(Many of these are available online as reproductions or FREE downloads from certain websites - very easy to find)

millinery_tool6.JPG


Millinery Accessories

Things you need to make m'lady's hat:
Hat veils, fray check (for ribbons), feathers, measuring tools, buttons, pins, thread

millinery_tool7.JPG


I am missing some other tools that a hatter needs. Who has a hat stretcher and steamer?
 

fletch31

Familiar Face
Messages
73
Location
Rexburg, ID
Thanks Art, it was listed as a Tolliker on the bay but the ones I was familiar with were shaped like those pictured here in the center and off to the side.
tools.jpg

They all seem to perform the same function in reinforcing the brim break so I thought it could be used double duty, just hot.
The scientific hat making book also has a brass foot tolliker pictured that look similar to these shown above but it also has some other metal appearing (tough to say for sure as they are drawings in black and white :) ) tollikers of different design with curved radiuses.

AirforceIndy, the puller down is the boomerang (for lack of a better description) shaped flat wood piece in the picture of Jim's work bench. It is used to pull the felt down over the block by the brim. There is a good illustration of it's use in the scientific hat making book if needed. A runner down is a piece of wood with a groove on the end used to push down on the hatting cord as needed to make the felt snug on the block. I have seen them looking like a pencil length 1/2" dowel flat tapered at the end with an 1/8" rounded groove at the end to wider designs that also taper down. I am by no means an authority on this stuff but have been feeding voraciously for a few years getting as much info as I can. I am yet unproven and as I have not yet made a hat completely from scratch by hand, take what I say for what you think it is worth. I have reblocked a couple of hats and sewn in new sweatbands only as of yet. I am waiting for just a few more acquisitions and then I will go for broke making a hat from a raw body. I have picked up some good tips from here, and other places and will share what I do.
 

fletch31

Familiar Face
Messages
73
Location
Rexburg, ID
Real nice stuff Vintage Betty! You will have to post up some pics of your hats when you get them done. Will you do men's hats as well? Nice pics.
Fletch31
 

Vintage Betty

My Mail is Forwarded Here
Messages
3,300
Location
California, USA
fletch31 said:
Real nice stuff Vintage Betty! You will have to post up some pics of your hats when you get them done. Will you do men's hats as well? Nice pics.
Fletch31

Thank you Mr. Fletch31! It would be an honor. I'd like to do both...and would have started already....but life intervened - without my permission!. :rage:

Vintage Betty
 

Vintage Betty

My Mail is Forwarded Here
Messages
3,300
Location
California, USA
fletch31 said:
I snagged a pic of my rounding jack. Pretty simple design. I have seen them with knobs to adjust a metal band lining the curved area to change the radius for dimensional brim cutting. I'm modding this one to do that. I think they could be made rather easily overall. This one just uses exacto blades.

RoundingJack.jpg

This is the same tool as the one in my head block photo, but yours is much much better. I consider mine a complete waste of money, and I'm not sure if I can use it - need to try it out or ask an expert. Lesson learned - not all cool old hat stuff is worth buying. :eusa_doh:

Vintage Betty
 

fletch31

Familiar Face
Messages
73
Location
Rexburg, ID
Take heart Betty, You can probably get that thing working without much effort. The purpose is just to hold the blade away at a set distance from the crown to cut your brim to your desired size. As long as that knurled nut on back end there pinches that center piece tight enough to hold your desired measurement and loosens to allow you to slide it to begin with, you should be in good shape. These can be modified to use exacto blades and that sheet metal bottom just keeps the blade from cutting anything its not supposed to. The felt just slides right in between there. Are your adjustment knobs frozen up?

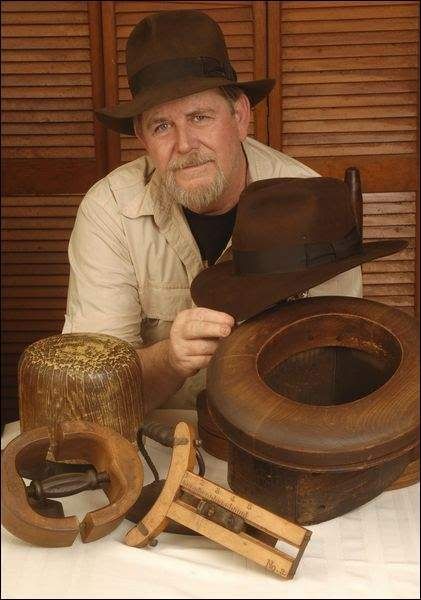
Here is that recent picture of Steve Delk from a newspaper. You can see some of his stuff for making hand made hats. His rounding jack was really old from the 30's or so as well and he was able to get it to accept exacto blades.
SteveDelk.jpg
 

airforceindy

One of the Regulars
Messages
263
Location
Anchorage, AK
WOW, with this many pictures going up this quick, this has the makings of a really great thread!
Fletch, thank you so much for the pictures; they have been very informative, despite a misunderstanding concerning the name of one item:)
Thanks, Art, for chiming in, and i hope you will be able to contribute even more priceless pearls of wisdom from your years of experience!
VB, your collection of lady's headwear and accessories is astounding; thank you for contributing! That vintage grosgrain is worth a pretty penny in the hatter's world, I'm sure!
I managed to get into the wood shop today and cut out the layers of my soon-to-be hatblock. It remains to be seen whether or not said layers will sandwich together well enough to make a solid entity. More to come on that. The photo of Steve is very valuable tutelage, if only for a peek at the infamous Adventurebilt block, and some of his other tools of the trade. He's truly a self-taught master, and to be respected greatly as such. To say nothing of Mr. Fawcett, who, I gather, began his trade much in the same fashion as Steve Delk. Art, your work continues to awe and inspire me as I attempt to grasp this art that is slowly and painfully making a comeback in the general public through the efforts of gents such as your self and Steve Delk, and the aspirations of young fellows like myself and Mark Brody (among others).

Keep the photos coming, everyone, and lets broaden this to encompass hat making as well; bring on the photos of raw bodies, blocked felt, in-process ribbon treatments, and everything else to do with amateur hat making!

Highest Regards to All, Andy
 

Forum statistics

Threads
109,645
Messages
3,085,637
Members
54,471
Latest member
rakib
Top