The Fedorable
One of the Regulars
- Messages
- 220
- Location
- Califonria
Wait, is that how you did it or how it's normally done? That looks like cheating! Haha.
A lovely hat nontheless.
A lovely hat nontheless.
Wait, is that how you did it or how it's normally done? That looks like cheating! Haha.
John: Always iron the ribbon into an arch - just like the arch of a sweatband. The reason is the same: To get the ribbon to taper, so you are sure, it will tighten around the crown in the top. It's also mentioned in this post. Scroll down to where Jim's wife irons the ribbon.
Wait, is that how you did it or how it's normally done? That looks like cheating! Haha.
A lovely hat nontheless.
The bow on my Biltmore seems to be one of the unusual ones.
Please accept my thanks to you and all the other hatters, hobbyists, professors ;-), and affectionados in this forum for sharing what you know about hats and hatting.

I didn't get photos of every step, but here's a conversion from a strat/OR to a fedora ribbon & bow.


I tacked the bottoms first as previously noted, then stretched the top to take up the slack on the taper, making sure to put a little crease in the middle so the ribbon "dives" into the bow. I used a mismatching thread, but will switch it out when I have the right stuff. The bow is straight out of the tutorial.
Oh, to prevent having to tweak the gap, it's best to make the bow first & fit the gap to it. Also, tacking and tying with individual stitches gives you the ability to tweak without starting all over.
"Faint hat never won fair lady."
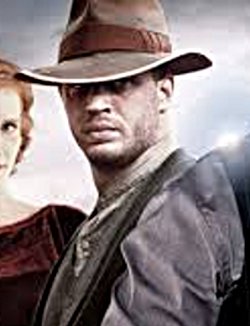
I like that. It really explains a lot! Dane, John G., thanks for the help guys. I for one really appreciate these tutorials. Here's another type bow that I've been interested in learning, the so-called "Shark Gill" bow as seen in the movie, "Lawless". What do you think. How would you make this type of bow?...Thanks for the kind words, but you top that list
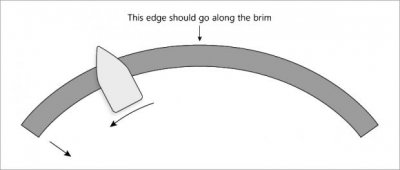
My addressing you in the latest post on the curve-pressed ribbon was probably a bit retoric. I'm sure, that you understand, but it's the thing that makes many DIY ribbons flare in the top. To be sure, it's understandable, I have made a small illustration of what I do:
View attachment 8221
I try to drag one end toward me, while I move the iron a little sideways in the direction of the dragged ribbon end. Again, be gentle and do it a little at a time. Run it over several times and do change direction. It will eventually curve, but it takes a little time and effort. When the curve is right, leave the ribbon alone some minutes to cool off.
The reason to curve the ribbon is to force the two edges into different lengths. If you place the longer outer edge along the brim, the inner edge will be shorter and tug tightly around the crown. Even if a ribbon seems tight, in damp weather it'll loosen up a bit and sometimes flare at the top. I always curve my ribbon to be sure, but as I stated earlier, there are so many approaches ... they all end up in a hat


Here's what I did. About 1/4 inch folds, on the leading edge. I folded each back over a business card to get the tail part of each fold uniform. The last fold (the 7th gill) will be on the hatband, so I folded the hatband over itself to create a beginning and end of that gill. I'm not done, because I need to attach the sweat before attaching the bow, but I think you'll see how this will work.


The 7th gill is actually a mock up. I had thought about doing this with one piece, but had to abort because it took a lot of ribbon & I had not cut a long enough piece. I made this to see how it would look when I attach it.
This last photo is of the bow laid on the hat. Note the ring from upsizing this grey 6 7/8 Stetson Nutria Quality cowboy hat to a 7 1/8 wide brimmed fedora. This discoloration will be hidden behind the bow. If I'd downsized the hat, it would be on the brim and ruin the hat.

"Faint hat never won fair lady."
 John Lofgren Monkey Boots Shinki Horsebuttt - $1,136 The classic monkey boot silhouette in an incredibly rich Shinki russet horse leather.
  Grant Stone Diesel Boot Dark Olive Chromexcel - $395 Goodyear welted, Horween Chromexcel, classic good looks.
  Schott 568 Vandals Jacket - $1,250 The classic Perfecto motorcycle jacket, in a very special limited-edition Schott double rider style.