Want to buy or sell something? Check the classifieds
  • The Fedora Lounge is supported in part by commission earning affiliate links sitewide. Please support us by using them. You may learn more here.

Photos of hatters tools

ideaguy

One Too Many
Messages
1,042
Location
Western Massachusetts
After spending over 16 yrs in the antiques business, dealing with a lot of
"primitives" and odd/obscure tools, simply as a sideline to mainstream early
furniture, etc., seeing these wonderful tools was a real delight!! Thanks, all,
for sharing your knowledge, photos, links, and most of all: enthusiasm.
The spark and passion still keep my eyes a'poppin-love this stuff!
thanks!!
 

airforceindy

One of the Regulars
Messages
263
Location
Anchorage, AK
Thanks for the additional posts, folks! I'll probably wind up making my own tollicker; looks simple enough.

As for my much-talked-about (by me!) block, I stuck it all together yesterday, with the help of some Gorilla Glue and bar clamps. Unfortunately, I ran into the same problem as Mark Brody: warping. There are some gaps between the layers of 2x10 pine that could not be closed with the max pressure allowed by the bar clamps. Just couldn't do it. Didn't get to take pictures, as the camera was confiscated to take pictures of my boy's first easter-egg hunt. I will start sanding it down to size next week and see if it holds up. Might just require a lot of wood putty. If it can't be fixed, I'm tempted to try the foam insulation and Bondo method. Wood is stinkin' expensive these days, and I still don't feel like shelling out the dough for a custom block. Way too much mulah for my meager hat budget. Hopefully I can make my next stripe this year... I test for Tech Sergeant (E-6) on Tuesday for my second time. That'd be a nice little pay raise! Wish me luck...

Regards, Andy
 

fletch31

Familiar Face
Messages
73
Location
Rexburg, ID
AFIndy, Steve Delk had good success with having bondo on wood hold up to the rigors of reblocking before he went full production. It doesn't make for the prettiest block but it certainly is functional. I used bondo on my old vintage block to fill in some cracks and scrapes. I cringed to do it because it is vintage but it was necessary not to have these cracks and such create anomalies imprinted in my felt. Some blocks are in better condition than others. Pine is a very soft wood and a harder wood is preferred for a hat block. Because of aesthetics only, Steve suggested buying a vintage hat block on OFAS that is a size or more larger than the one that you need and just sand it down to the profile and style that you would like. ie. straighten up the sides, adjust the top dome radius etc. That way you have a solid hardwood block made from poplar, in the style that will yield you your desired hat and you don't have to campout online hunting down particular hat style numbers in your size and potentially paying more than you would for it to be made new. By the way, the new blocks these days are made from slabs just like you are doing but mostly out of basswood instead of poplar. Basswood is a decent wood for strat style guitars because of its combination of light weight and relative strength but it is still softer than poplar and you can scratch it with your fingernail with a bit of effort. Its not as bad as pine though and still works as intended. I don't mean to say junk your homemade block as it really will work for your short term needs but if you want to put some sustained use on it, you will find it dents up on you rather easily. Just some ideas. I often quote what Steve Delk has done in my suggestions because he is proven in action, has graciously documented his experiences for us hobbyists, and has been the most free with publicly offered information in the past. All that I have said regarding him can be found in posts he has made in the past here and elsewhere. I just don't mean to pass his methods or knowledge off as my own original ideas. I have learned from his postings as refinements to fundamental knowledge contained in the Scientific Hat Making book and have tried many of them. I have always been very happy with the results as he is a straight shooter. I think his nature has contributed to his marvelous success as a result. Though he doesn't post here anymore, he has been a great resource here and more particularly on COW.
I have saved some good posts from Art Fawcett here as well. It will be cool to see how things turn out for you. Post some of those pics up when you get a chance :) Happy Easter by the way and good luck with your E-6 test. I served in the Navy as an Aviation Electronics tech and switched to the Air Force reserves as a Dental tech at Hill AFB when I got off active duty in '97. I'm out completely now but have fond memories of my time in service. Thanks for doing what you are doing.
Fletch31
 

Tango Yankee

Call Me a Cab
Messages
2,433
Location
Lucasville, OH
airforceindy said:
I test for Tech Sergeant (E-6) on Tuesday for my second time. That'd be a nice little pay raise! Wish me luck...

Regards, Andy


:eek:fftopic:

Andy,

You have been studying hard, right? :D

TSgt seems to traditionally be one of the hardest ranks to make in the AF for some reason, but some career fields are harder than others. If you've been studying, make it a point to get to bed a little earlier the night before, get up and have a good breakfast and a relaxed morning, I'm sure you'll do fine!

But of course, a little luck can't hurt, so Good Luck!

Cheers,
Tom
 

airforceindy

One of the Regulars
Messages
263
Location
Anchorage, AK
Thanks, Tom:D Yeah, I've been studying. That PDG (formerly PFE Guide) is so BLOODY boring! I tell ya, I have NO problems getting to sleep after keeping my nose in that for an hour! Monday will be a long day of cramming, followed by dinner and a short conversation with Sam Adams, then as much sleep as I can get. Let's get this over with so I don't have to worry about again until summer when the list comes out!

Went down to Wally-World today with the wifey. I hate that store with a passion, but it was necessary to find some sewing accessories. I felt a bit like a fish out of water, surrounded by little old ladies picking out new knitting needles and crochet hooks. Aren't guys my age supposed to be over in sporting goods or checking out the latest XBox games?;) Anyway, picked out some mid-heavy needles, thimbles (a must!), heavy gauge thread, straight pins, and a cloth measuring tape. First purchases past my block materials, so I'm on my way! Next stop is tools, sweatband, ribbon, and felt. Probably in that order. On the other hand, perhaps I should get my felt before the ribbon. I might just be inspired to go with a different colored ribbon once I get the hat body; hmmm, I'll have to think about that one.

Regards, Andy
 

Topper

Vendor
Messages
301
Location
England
On the extreme left is wood, next to it are 2 handled ( one missing) Floosters or Fluting Irons, below them is a part of a "shackle", and also a brass brim iron.

The central peices are 3 vaiorus brass "tollikers" (note no "c" in the word)


fletch31 said:
tools.jpg

They all seem to perform the same function in reinforcing the brim break so I thought it could be used double duty, just hot.
The scientific hat making book also has a brass foot tolliker pictured that look similar to these shown above but it also has some other metal appearing (tough to say for sure as they are drawings in black and white :) ) tollikers of different design with curved radiuses.
 

carldelo

One Too Many
Messages
1,568
Location
Astoria, NYC
Hat size clarification

Spatterdash said:
Betty, thank you. That hat gauge is cool, but I'm needing some clarity on it's numbers.

I thought that if you wore a hat that measured 7 3/4 in American size, that meant that the length of your hat oval, or opening, was 7 3/4 inches from front to back.

According to that hat gauge, my hats should measure 8 1/2 inches from front to back and 7 from side to side.

Am I misreading that thing?

:eek:fftopic: Slightly OT, but Spatterdash, here is my understanding of the gauge:

For American hat sizing, your hat size is defined to be the diameter of a circle with the same circumference as your head, so hat size is a sort of approximate diameter (similar to hydraulic diameter in piping).

Basic math-wise: (Head Circumference) = (Hat Size) X (Pi).

My size is 7-3/4, which I got by measuring around around my head with a tape (24-3/8") which divided by PI gives 7.76" or close enough to 7.75. It can be useful to remember that Pi is very accurately approximated (within .05%) by the fraction 22/7, so a size 7 hat has a circumference of almost exactly 22" (OK, it's 22.991").

The length and width markings on the measuring device should be the dimensions of a 7-3/4" standard oval hat, I believe. I just checked the dimensions of my new, size 7-3/4 Stetson (which fits perfectly) and the dimensions are very close to 8-1/2" long by 7" wide. I note that in each case on the gauge, the length is Size+3/4, and the width is Size-3/4. This isn't a proper family of ellipses, mathematically speaking, as the ovals at different sizes won't be geometrically similar, but I'll bet they're pretty close.

A long oval would be for a longer and narrower head for a given circumference, but I'm not sure by how much longer. There's something to be said for metric sizing, which is just the circumference of your head in cm. For me, it's 61.9 cm, so a size 62 fits just right.
 

airforceindy

One of the Regulars
Messages
263
Location
Anchorage, AK
Tried sewing in a liner for the first time today. What a pain in the a**!!! Patience, Andy, patience. Practice makes perfect, and I'm gonna keep on practicing on my cheap-o Dobbs until I'm ready to buy new felt.
 

carldelo

One Too Many
Messages
1,568
Location
Astoria, NYC
Cool tool

Betty, I like that Edward Scissorhands hat sizer! Often on old tools there is an ability to calibrate them. If that little teardrop-shaped indicator can be moved, you might be able to adjust it so that it reads the proper hat size. Failing that, you could put some white tape with offset marks to show the correct size, but it won't look as cool.
 

Vintage Betty

My Mail is Forwarded Here
Messages
3,300
Location
California, USA
carldelo said:
Betty, I like that Edward Scissorhands hat sizer! Often on old tools there is an ability to calibrate them. If that little teardrop-shaped indicator can be moved, you might be able to adjust it so that it reads the proper hat size. Failing that, you could put some white tape with offset marks to show the correct size, but it won't look as cool.

It's pretty fun, and travelled a long way to meet me. It's a tool from the 1800's, so, as you already know, the calibration is definately off.

Having worked in a hardware store for many years, you never really get these old tools to be extremely precise, unless they are a finite calibration tool anyway. ;)

However, I'm pretty clutzy with my antiques, and the seller did such a wonderful job at cleaning this item, I'm hesitant to fix it until I know for sure that I won't accidentally make another mark on this lovely piece.

So, I'll just take my time until I make some time to fix it properly. Maybe I'll take a snapshot or two when I try it....

In the meantime, here's another beauty that I just picked up...no more ebay for me for quite some time:

Antique Flower Tool

Another tool to make Ladies Flowers. You put felt in between the heated pieces and squish them together. This thing is heavy! Six pounds! :eek:

millinery_tool8.jpg


Where's J.T. with his electric hat stretcher?

And can someone show me action shots of how to use those lovely hand tools in that small photo on the previous page? The ladies millinery books don't show how to use those types of hand tools. It's all sewing, sewing, sewing.
 

Vintage Betty

My Mail is Forwarded Here
Messages
3,300
Location
California, USA
Feraud said:
A cool tool.
Why is it not accurate?

Old tools frequently lose their accuracy with time and age, and wearing of the metal or wood bits.

In this case, the measurement is off up to 1/2 size, and so the calibration or tightness of the metal and the pins need to be readjusted to be accurate again.

This is a pretty common problem for old tools, and this isn't that bad of a problem to fix, considering it's about 200 years old. :p

Vintage Betty
 

Tango Yankee

Call Me a Cab
Messages
2,433
Location
Lucasville, OH
Vintage Betty said:
And can someone show me action shots of how to use those lovely hand tools in that small photo on the previous page? The ladies millinery books don't show how to use those types of hand tools. It's all sewing, sewing, sewing.

And in the Scientific Hatmaking book the sewing bits are skimmed over by saying you should be able to get a local woman to do that sort of work! "There is no reason why the proprietor of a growing renovating shop should need ever to touch a needle." Tell that to Art, Jimmy Pierce, or any of our other hatters here these days! lol

Cheers,
Tom
 

Vintage Betty

My Mail is Forwarded Here
Messages
3,300
Location
California, USA
Tango Yankee said:
And in the Scientific Hatmaking book the sewing bits are skimmed over by saying you should be able to get a local woman to do that sort of work! "There is no reason why the proprietor of a growing renovating shop should need ever to touch a needle." Tell that to Art, Jimmy Pierce, or any of our other hatters here these days! lol

Cheers,
Tom

Thanks for letting me know my place in the hatmaking world! :p

Problem is...I never followed directions well....;)

And I'd love to see a thread started of photos of hatmakers hands! I'm sure they have stories to tell...

Vintage Betty
 

J.T.Marcus

Call Me a Cab
Messages
2,354
Location
Mineola, Texas
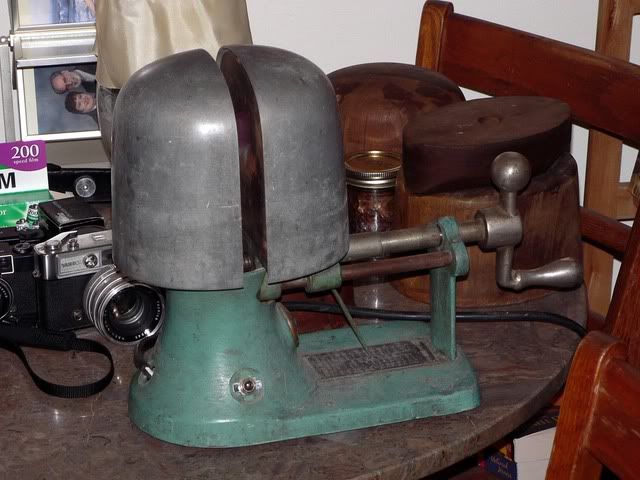
Vintage Betty just sent me a PM, requesting that I post this. Thanks for remembering me, Betty. :) It's an adjustable, aluminum dome hat stretcher, with a built in heating element. This particular example was used by Stetson, at the St. Joseph, Mo. factory. Jimmy Pierce purchased it, at the liquidation auction, after the plant closed. He sold it to me in December of 2007.

P1040588A.jpg


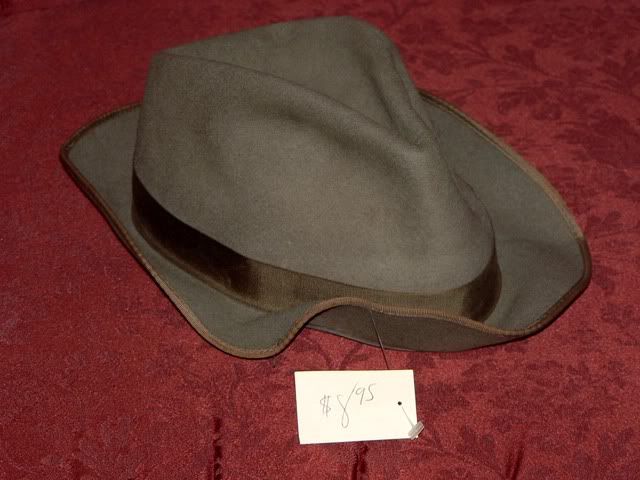
The first step is to soak the hat with cold water. This hat was a good candidate.

P1040588B.jpg


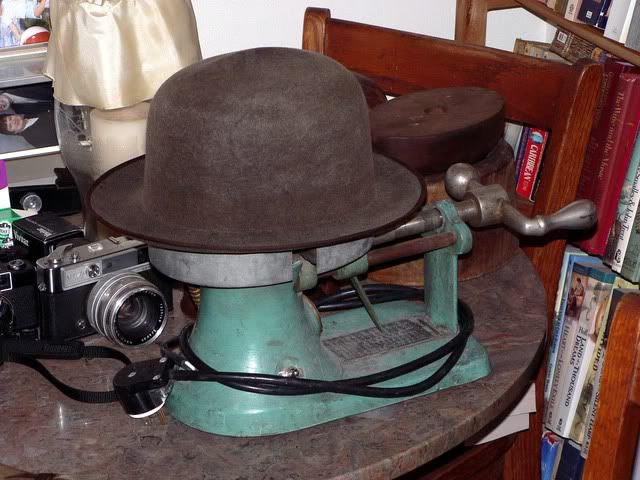
With the stretcher closed down to its smallest size, the wet hat is put in place. I found it helps to hold the palm of one hand firmly on top of the hat crown, while slowly turning the crank to the desired size. The guage (along the base, to the right of the crown) is calibrated for exact size without a sweatband. If a sweatband is in the hat, the guage should be set to the next smaller size. (i.e. 7 will give you a 7 1/8 hat.)

P1040590.jpg


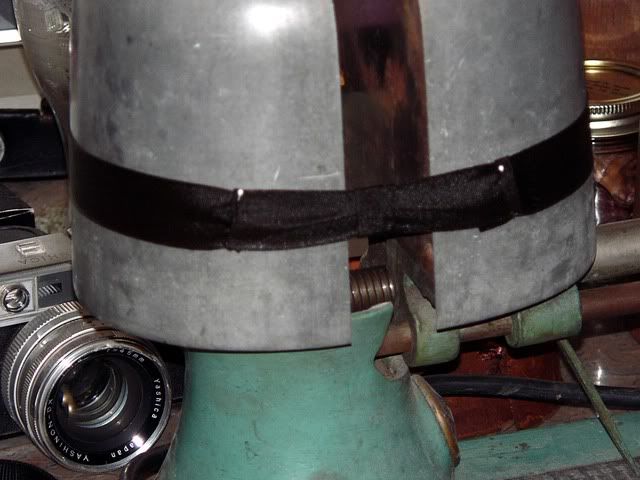
It can also be used to stretch a ribbon, if need be!

P1040593.jpg


The finished product.

P1040598.jpg


You may have noticed I didn't have the power cord plugged in. I've heard warnings about how easy it is to over do it. I've always preferred to let hats dry naturally. It takes about two days, and I'm not in a hurry. The heating element was to allow a hatter to do the whole job, while the customer waited. You could then walk out of the shop with your hat back on your head!
 

Forum statistics

Threads
109,306
Messages
3,078,470
Members
54,244
Latest member
seeldoger47
Top