Want to buy or sell something? Check the classifieds
  • The Fedora Lounge is supported in part by commission earning affiliate links sitewide. Please support us by using them. You may learn more here.

Making a Hat Block

Jerekson

One Too Many
Messages
1,620
Location
1935
I would like to make a custom shaped block that I can use for a number of my hats, namely my Akubra, so tha tI may be able to get more of the reverse taper that I'm into.

Any recommendations? I made a plaster cast of the inside of my Akubra and am using that a little bit, but...it's a copy, not a custom block.
 
Messages
10,939
Location
My mother's basement
Jerekson said:
I would like to make a custom shaped block that I can use for a number of my hats, namely my Akubra, so tha tI may be able to get more of the reverse taper that I'm into.

Any recommendations? I made a plaster cast of the inside of my Akubra and am using that a little bit, but...it's a copy, not a custom block.

Is this a plaster cast of the open crown? I ask because the particular type of crease (or bash or whatever you wanna call it) can be put in the felt after it has been blocked into an open crown. (Forgive me if I'm stating the obvious here.) Indeed, Akubra Federations leave the factory open crowned, right? And such was the prevalent industry practice back in the glory days, right?

Sounds like what you need is the right block. Yes, you can make your own. Could be the better route than trying to find the right one on eBay, especially if you don't anticipate working on anything but your own hats.

Now, as to a flange ...
 
Messages
10,939
Location
My mother's basement
And ...

Art Fawcett once shared a tip for getting that reverse taper. As I recall, it involved using a band block smaller than the crown block, so that the crown was a tad smaller at the bandline (the junction of crown and brim) than it would otherwise be. (Am I remembering this right, Art?) This way, when the top of the crown is creased (in a center dent, say) it will be larger than it is at the bandline, thereby creating that reverse taper.
 

Jerekson

One Too Many
Messages
1,620
Location
1935
Thanks for the help Tonyb.

Yeah, I plastered the open crown when I first got the hat. It didn't turn out particularly well though - and I think I could find a better shape than the one Akubra uses anyway.

I would like to hear some more details about Art's trick. I was planning on sanding a groove into the lower part of the block for the band to set in while on the block. Is that the same thing?
 
Messages
10,939
Location
My mother's basement
Jerekson said:
Thanks for the help Tonyb.

Yeah, I plastered the open crown when I first got the hat. It didn't turn out particularly well though - and I think I could find a better shape than the one Akubra uses anyway.

I would like to hear some more details about Art's trick. I was planning on sanding a groove into the lower part of the block for the band to set in while on the block. Is that the same thing?


Well, it's in the archives somewhere. I'd search for it, but I'm fixing dinner, etc. If I were to search in the hats forum, though, I think I'd use "reverse" as the search term.

That idea of making the block smaller at the bottom than at the top wouldn't work, unless you made a "puzzle" block, the kind that's in pieces and is assembled and disassembled inside the crown. If it were all one piece, you couldn't get the hat body off the block without distorting the shape all to hell.

Did you check out that tutorial over COW? If you made a stovepipe-straight block (like the one in the tutorial), you would probably get that reverse taper (as viewed from the side) when the finished hat was given a center dent. Or so I would think. I don't have such a block, but I can tell tell you that even a relatively straight-sided block, such as the much-coveted No. 52, tapers in a little toward the top. With most creases (bashes, whatever), a No. 52 crown comes out pretty darned straight. With one of those no-taper (excepting just a touch of rounding of at the top edge) blocks, well, I bet it would "reverse" for you. And that block looks fairly easy to make, too.

Should you give it a go, maybe you could also make 'em for those of us who really shouldn't get within 10 feet of a power saw.
 

Jerekson

One Too Many
Messages
1,620
Location
1935
Funny that you mention a "puzzle block" - that's actually exactly what I designed.

It will have two side sections, a front and back section, and a middle section...if it works how it should then I think that I can get it to turn out nicely.

It looks like the wood board stack-up is my best bet, I'll try that.
 
Messages
10,939
Location
My mother's basement
I'm really interested in seeing how this works out, Jerekson. At the top of the list of frustrations in setting up a hat shop is acquiring the right equipment. Buying this stuff on eBay poses many of the problems of buying almost anything on eBay. You know -- inaccurate descriptions (sometimes wildly so), difficulty in assessing actual condition from photos, excessive shipping charges, etc., etc. It would be just splendid if more folks got into building hatting equipment, blocks and flanges especially.
 

Jerekson

One Too Many
Messages
1,620
Location
1935
It's definitely possible. The tools needed for woodworking (I use a scroll saw almost exclusively) are few and a good investment for how long you can use them.
The real added benefit IMO is that when creating your own hardware, you have limitless customization. In my case, a specially engineered reverse-taper block - where on eBay can you find one of those?
Personally the no. 52 has never been good enough for me, and if I create my own, it doesn't have to be.
The only problem I'm really having with this theory though is flanges. To this day I've still not the slightest idea of how they originally made those things, and I doubt I could ever accomplish something like that, at least not in a syymetrical form. I've been eyeing them on eBay but ultimately, I won't end up doing it. As you've pointed out, eBay isn't a good place to look for something as precise as hatmaking tools. It really is the better decision to go your own route, unless you are looking for historical accuracy or things like that.

Tonyb, with the skills that you've shown in general hatmaking, there could be a place for your own line of custom shapes. I'd be interested in helping you out with that.
 

Kuki

One of the Regulars
Messages
277
Location
Barcelona
I'm new to the forum, and I'm enjoying very much reading all the threads and learning from everyones input.
I made a hat block out of cork and documented the process, you can see the pictures if you follow this link. You can find written details at my blog.
1999499738_b29ffcc730.jpg

The block is for a homburg (I didn't know until I landed on this forum that creases on men's hats should be done by hand!).
I believe a good way to get the reverse taper would be to have the front taper parallel to the taper on the back (which wouldn't look bad actually). That would allow the hat to come out of the block. The other option is the one already mentioned of a puzzle block.
 

ChicagoWayVito

Practically Family
Messages
699
Hi,

Does this site or any other that you know of have a tutorial for making hat blocks? I am specifically looking for Open Crown. Dimensions would be helpful also information on sizing them up and down.
Thanks in advance.

Cheers!
 

moehawk

I'll Lock Up
Messages
5,841
Location
Northern California
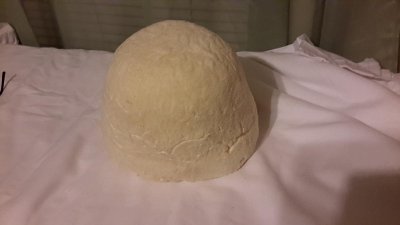
Well, it might not be exactly what you arre looking for, but the block I'm using I made following instructions Ifound googling "how to make a fedora". Basically, it says to find a cheap straw hat the right size and crown shape (tightly woven straw is essential) spray lacquer inside of it to seal it further, and when lacquer is dry fill it with gap sealing foam. Instructions said to use "Great Stuff" brand Large Gap formula, which I did, and let it cure at least 1 day before proceeding. Remove from hat or in my case peel the hat off the block, then trim and sand it to final shape.
You end up with something like this:
20150107_184634-vi.jpg

Not the best by any means, but better than nothing. I am going to get a real wooden one made soon, but for now it's what I have.

Hope it helps.
 

ChicagoWayVito

Practically Family
Messages
699
@moehawk, that is a pretty good idea. Thanks for the input.

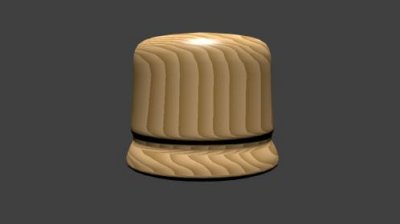
I spent the last 6 hours learning a 3D program called Blender 3D (its free) and tried modeling a hat block with the following dimensions:
Height: 5 inches
Width: 7 1/8 inches
Length: 8 inches

Those are on the large side for me but I can change the model anytime. There is a possibility that I can run this on a CNC machine at work. I just need to check the work size area that it can handle and get some training on it.

This is a rendered image of the model, this is meant for a Bowler style hat. The lip 3/4 of the way down is for the cord and the rest of it is just a stand, I can remove that if it would be better without it. What does everyone think of the model? I would like feedback.

OpenCrownHatBlock.jpg
 

humanshoes

One Too Many
Messages
1,446
Location
Tennessee
IMG_2025.jpg IMG_2027.jpg IMG_2030.jpg
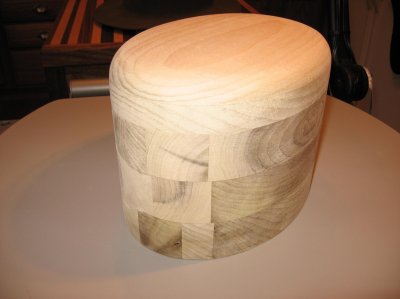
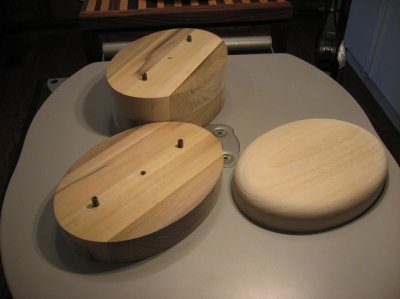
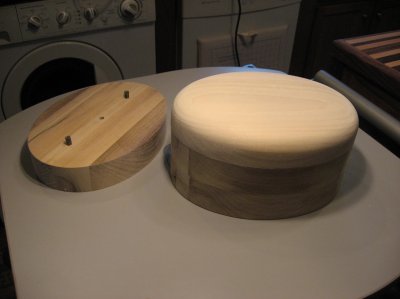
Hello ChicagoWayVito and welcome to the lounge. I don't know if this will help you out or not, but I made this convertable hat block using 2x2 poplar cut and glued up in layers for a long oval size 7 3/8. I can adjust the height and make different style crown tops without having to build a new block for each style. The circumference of the block should be 1/2" larger than the desired finished interior hat circumference.
 

J. Adams

New in Town
Messages
7
View attachment 22513 View attachment 22514 View attachment 22515
Hello ChicagoWayVito and welcome to the lounge. I don't know if this will help you out or not, but I made this convertable hat block using 2x2 poplar cut and glued up in layers for a long oval size 7 3/8. I can adjust the height and make different style crown tops without having to build a new block for each style. The circumference of the block should be 1/2" larger than the desired finished interior hat circumference.

Wow, this is amazing! Would you be willing to share plans, if you have them? I've been trying to figure out how to make something exactly like this, and it's just escaping me. I'm good at working with felt and straw, not so good at working with wood.
 

humanshoes

One Too Many
Messages
1,446
Location
Tennessee
Hello J. Adams,
I'd be happy to share the plans if I had them, but the block was a product of my overactive mind and nothing was committed to paper. I can tell you that I traced the oval from a long oval band block that I had lying around to make sure the circumference was correct. There is a center bolt through the middle that holds it all together. Sorry I couldn't be more helpful. If you'll email me at phoenixhats@outlook.com I'll send you a few more detailed pictures of the block.
 

J. Adams

New in Town
Messages
7
Hello J. Adams,
I'd be happy to share the plans if I had them, but the block was a product of my overactive mind and nothing was committed to paper. I can tell you that I traced the oval from a long oval band block that I had lying around to make sure the circumference was correct. There is a center bolt through the middle that holds it all together. Sorry I couldn't be more helpful. If you'll email me at phoenixhats@outlook.com I'll send you a few more detailed pictures of the block.

Thanks so very much! On the contrary, that's tremendously helpful. I'm gonna try to make one. I'll post progress here, and I may email you as well! Thanks again.
 

Nuance97

New in Town
Messages
7
Forgive me if this has been covered. I’m new here, and this is my 1st post.

I have always wanted an Indiana Jones hat, but other stuff took priority for years & years. I finally pulled the trigger and got one only to be disappointed.

This is how it arrived
full

Severely tapered and after steaming out the bash I discovered that the crown was very lopsided… I knew I’d have to make a block and re-block the hat to ever get it right. This thread will document how I did that. I hope it proves to be useful

To get started I had to determine how to shape the circumference
I did this using my Akubra Federation IV as a pattern
full


Once I had this template I could transfer it to my wood which was 2x8” pine scrap. I know framing lumber isn’t ideal but it was free and I’m not a hat maker so durability isn’t really a concern.

I traced out my shape using the cardboard template 4 times, and cut them out on the bandsaw. I then had to spend some time with my belt sander getting them to just the right size. I eventually got there, and I glued them up.
full


Now I needed to determine how to carve it, and lucky for me Herbert & Johnson have some great pictures of open-crown Poets that I used for reference.
Front
full

Side
full

You can see I used grid lines to get it scaled properly since I know the crown height needs to be 5.5” it was pretty easy

I’ll remove wood in multiple facets to give me what I’m looking for.
full

full

Each facet I will remove is color coded here
*Blue will go 1st. This will taper the front and back to match the photo
*Red second to remove the bulk of the waste
*Green 3rd
*Yellow last to leave me with my final shape

I’ll be using a Shinto Rasp to remove this material. This tool makes quick work of it
full


Marked out my guidelines to start the carving
full


Remove the Blue section in my diagram
full

full


On to removing the red facet in my diagram
full

full

full

Done

Now we move on to the Green facets
Marked
full

full


Removed
full

full

full
 

Forum statistics

Threads
109,301
Messages
3,078,258
Members
54,244
Latest member
seeldoger47
Top