Want to buy or sell something? Check the classifieds
  • The Fedora Lounge is supported in part by commission earning affiliate links sitewide. Please support us by using them. You may learn more here.

How To Paint On Leather Jackets: A Guide

Status
Not open for further replies.

Stand By

One Too Many
Messages
1,741
Location
Canada
How To Paint On A Leather Jacket, Part 1: Inspiration

Around here, we all love our WW2 flying jackets and the A2 in particular.
And some of us also love the nose- and jacket-art that adorned the fighters and bombers of the era too and the squadron patches and the fighter/bomb group patches and the pin-up girls and the names of the aircraft and even the colours and fonts - it all evokes a certain appeal of that era.
As a result, perhaps you have thought of wishing you would like to paint something like that on your jacket - to personalize it and make it truly unique in the world and undeniably your own?

That was just how I was feeling back in 1993. I had an Aviation Leathercraft A2 jacket and just felt it lacked ... something ... and I really just wished it could have some jacket art on it. But how would I go about doing that? Could I do it?
So back then, I went down to Hibbert Bros. on Surrey St. in Sheffield's city centre. Hibbert Bros. was a truly great art supply shop that had been there donkey's years when I was growing up - ands is sadly now long gone. But I went to ask about painting on a jacket and if they knew anything about how to do it. The two ladies behind the counter were great.
"Oh yes" they said. "We've had many bikers coming in here for years and asking the same thing and we sort them all out." That was encouraging!
And over about half an hour, they proceeded to tell me everything I needed to know on how to do the art myself - and I've followed their general instructions with every piece of jacket art I've done - and I have expanded upon it with my own acquired art skills and I now shall tell you what they told me and what I've learned.

Some thoughts on inspiration and what to paint...

But before all of that, I would say that there's the preliminary work to consider that is worth mentioning; namely how do you decide what to put on your A2 jacket?
Well, I'd suggest that it all starts with decent reference material. Try to get your hands on a few good books on WW2 insignia, aircraft nose art and of jacket art; the Maguire & Conway books such as “Art of the Flight Jacket” and “American Flight Jackets” (thanks again, Nick 123! You're the best!) are truly great. In there, you'll see dozens upon dozens of truly great and inspirational jackets of all the various theatres of war with the differing patches of various materials, some with minimal art works, others with a name of the aircraft on it in a nice 1940s font, others with a design and the lettering together and some with mission tallies of various styles.
With a tasty beverage and your feet up, enjoy slowly poring over them and make a note of those that appeal to your eye - and ask yourself why they appeal to you. Perhaps it’s just the name tag and patches, or the name that you find cool - or it's the font or colours that appeal - or the pin-up girl - or the aircraft that was painted on it and the angle/profile of it.
If it is the font only, you could copy it precisely - or write something else in that font but in a name that's personal to you. Enter "1940s fonts" into a search engine and you'll find loads on the web. Many are free and you can type in the name you want and the website will display that name in that font. You can adjust the size and then hit Print, et voila! Then you can simply take your hardcopy to a photocopier and adjust the copy size to fit the size of the jacket. Then you can get a tracing off that! It works for me every time and I've never paid for a font.

If it's the pin-up girl you are drawn to, ask yourself if it's the actual girl you like - or the style of the art/artist? You can find vintage pin-up girls galore online and in books such as “For The Boys – The Racy Pin-ups of World War II” (Collectors Press) and it may be worth looking at the other works of the artist to see if there is another that appeals more.
Personally, I'll add here that I find some (but by no means all) of the vintage pin-up art of the 1940s and early 1950s very appealing (and I make no apologies for it. Like all art, it is subjective) - but modern representations of nose art that adorn modern USAF aircraft leave me stone-cold. Back in the day, the girls were classy/cheeky and in accidental and innocent poses and they always left something to the imagination and were hand-painted. In contrast, the modern pin-ups that you see on B-52 bombers and A-10 Warthogs seek to emulate the era of days gone by, but by comparison, are totally unsatisfying (to me) in that the pin-ups are of a contemporary look – less innocent and more like a professional "dancer" (stripper) than the girl-next-door or office secretary - and are sometimes quite lewd and are always airbrushed (which imbues another distinct change in character of the art); all of which lacks any charm whatsoever for me. But that's just me.
Therefore, try hunting down the artist and the original work you are after as greater details and colour balance can be seen on-line or on another print, depending on the image resolution. Get the best you can acquire and I'd suggest spending some money there if you need to as it will reward you later.

If it’s the squadron and group patches you like, then the “Battle Colors: Insignia and Aircraft Markings of the U.S. Air Force in WW2” (Robert A. Watkins, Schiffer Military History) series of books are truly indispensable and mine have paid for themselves many times over and I couldn’t possibly have done what I’ve done without them.

As for the name for your jacket, I'd suggest keeping a list of names that you would put on an aircraft as if it was you flying in it. What would you suggest to your crew as a possible name? I kept a list for years in an old notebook and would simply add to it as the names came to me and I'd think "Man! That'd be sooo cool to have that on a jacket!" and into the list it would go for another day ....

In the instance of my latest jacket design to be painted, some of you will recall my tale of how Willow, one our rescue dogs from Texas, fell through the ice on a nearby frozen river on a Winter pre-dawn dog walk and I had to lower myself down a steep bank and into the chest-deep icy water to push her out - which suddenly left me in the same predicament as her of how to get out!!! Without regaling the full story again, I broke some ice to get upstream to a better part of the steep bank with tree roots so I could grab hold of them and lift myself up and clambered out and made it home in the -25C wind-chill - and I mentioned it here purely to relate how my ELC Irvin/C-3 and Buzz A-10 gloves fared in extreme conditions, as I know I wore them in rather unusual circumstances.
The story got all very nice replies and the general response was "Man, she's a lucky dog. You were both lucky!"
And it got me thinking that I was a lucky dog too!
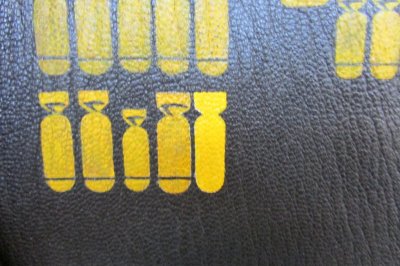
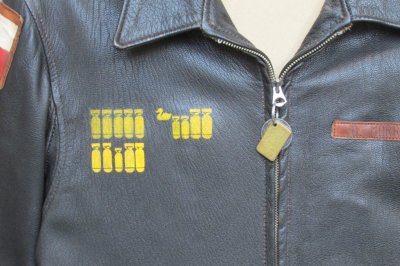
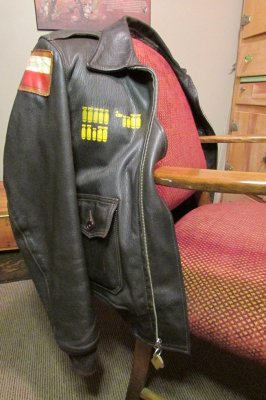
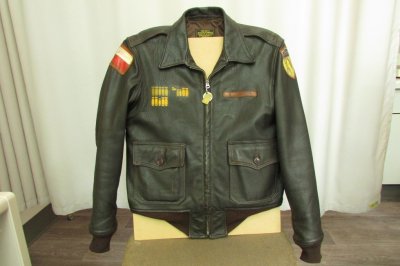
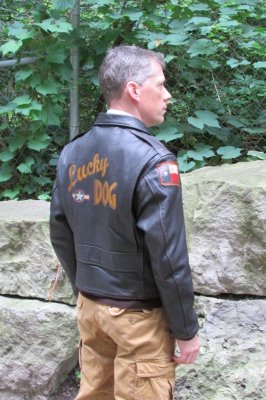
As stated here on my first post, my Aero ANJ-3 jacket art is based on an original ANJ-3 that had been on display at LAX airport and had very cool MTO theatre-made leather patches and bomb tallies painted on the front-right panel - and I added my mission tallies to represent all the animals that my girlfriend and I had had together over the years. Saving one dog in particular from Texas started all this jacket art - we called him Bo - and he was our first rescue from Texas; hence the Lone Star State leather patch (a copy of an original) and his rabies tag and shelter ID tag became the zip pullers and I had his shelter ID number stenciled into the lining of the jacket with a 0- prefix so it would look like the serial numbers seen on the tails of USAAF bombers.
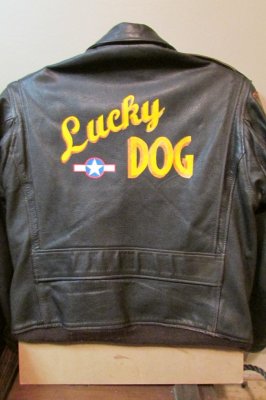
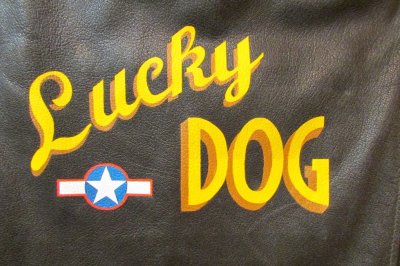
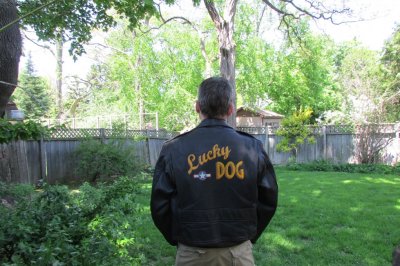
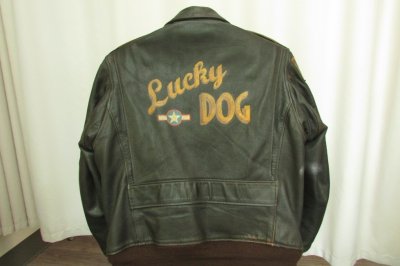
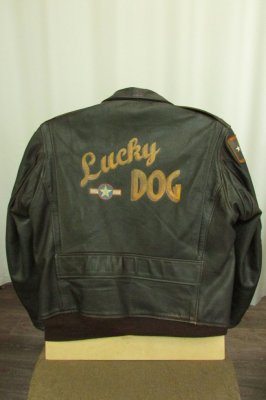
And suddenly, after that morning, I knew I wanted to paint on the back panel to commemorate this very cold brush with danger that Willow and I had together: and so Lucky Dog was the name.

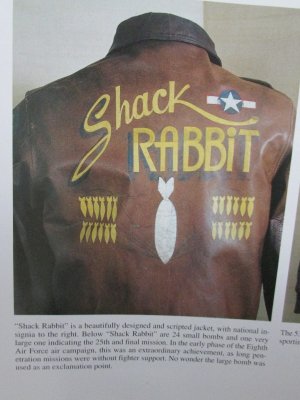
So I went through all my reference books and found a design on an A2 that really appealed and the one I liked was “Shack Rabbit”.

View attachment 32606

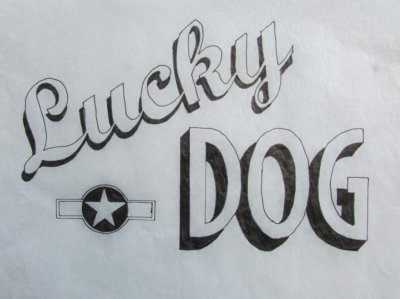
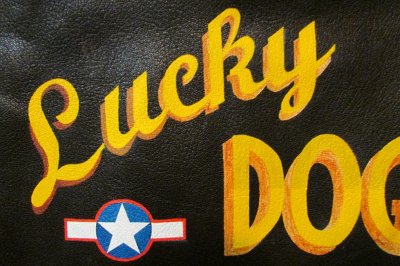
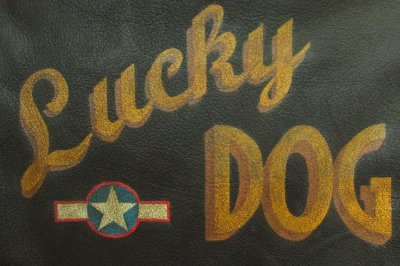
So with that for my inspiration, I abandoned my simple text ideas and I created the name Lucky (instead of Shack) - in the same (but very similar to Shack Rabbit) cursive font as my first work “Stand By” (as a sort of homage) - and worked it up from a free font online.

View attachment 32607 View attachment 32608

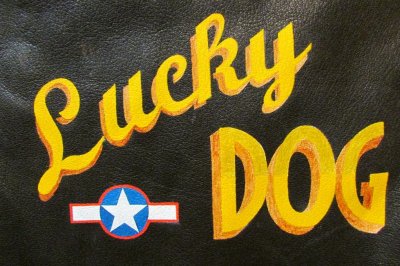
The DOG part was also created from a free 1940s font that almost perfectly matched the original font of Shack Rabbit.
Again, both were sized to match using a photocopier and it became a simple but patient matter of working them together to get the right size and in relation to the other.
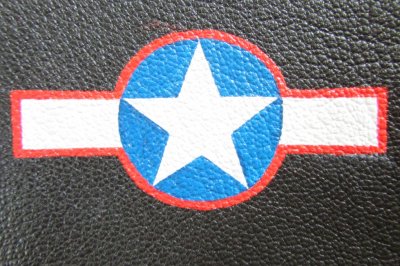
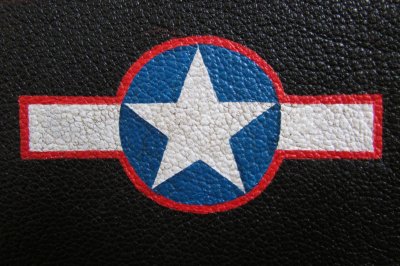
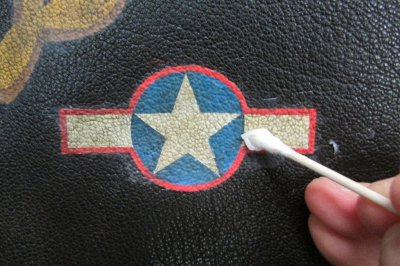
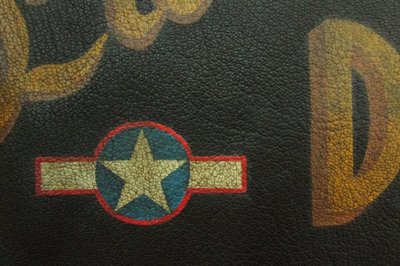
As my ANJ-3 is a jacket design unique to 1943, I chose to add the USAAF "Star and Bar" (as seen on Shack Rabbit) but the type appropriate to that year and I added it and moved it over and sized it appropriately to balance the design a bit.
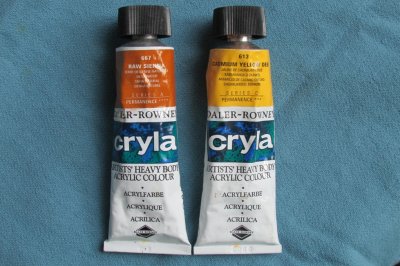
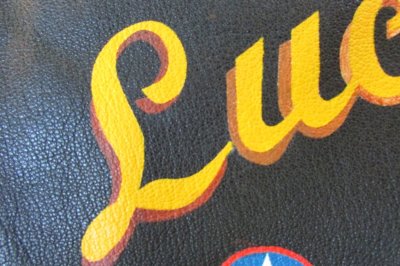
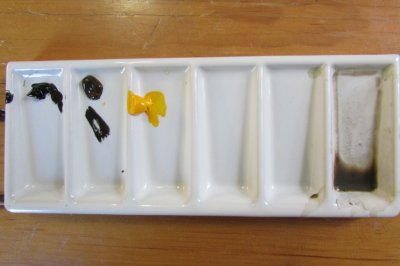
Another difference is in the colours I’ll use. The original Shack Rabbit lettering appears to be cadmium yellow deep with a black drop-shadow, which is fine as the jacket is russet. However, my ANJ-3 is very dark brown and any black paint would disappear into it and barely be seen, so I chose to use a lighter burnt sienna as it’s a nice complementary colour to the cadmium yellow deep and is reminiscent of that era.

View attachment 32609

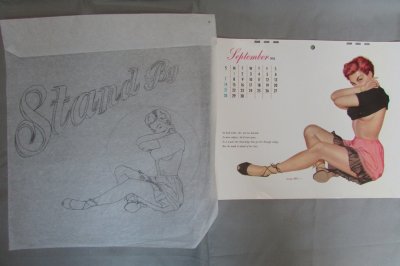
And yet, I still feel like doing a new version of Stand By – but adding Esquire’s Miss September, 1952. I got an original sheet of the calendar from eBay and it’s amazing how much more detail there is than the illustration I first saw in a book, but the blacks of her strappy shoes and pullover really lend it more to a russet jacket, I think, so they’ll stand out more. A design for another day and another jacket, I think.

View attachment 32605

But you can see how the choice isn’t easy. And that part I can’t help you with either!

And with that all prepared, then I made my stencil - and that's what I'll explain next ...


End of part 1.
 

Attachments

  • MissSeptember1952.JPG
    MissSeptember1952.JPG
    144.6 KB · Views: 1,869
  • ShackRabbit.jpg
    ShackRabbit.jpg
    750.8 KB · Views: 1,914
  • LuckyDogIdeas.JPG
    LuckyDogIdeas.JPG
    152.7 KB · Views: 1,825
  • LuckyDogStencil.jpg
    LuckyDogStencil.jpg
    145 KB · Views: 1,827
  • LuckyDogColours.JPG
    LuckyDogColours.JPG
    287.3 KB · Views: 1,986

Stand By

One Too Many
Messages
1,741
Location
Canada
How To Paint On A Leather Jacket, Part 2: Getting ready/Creating Your Stencil

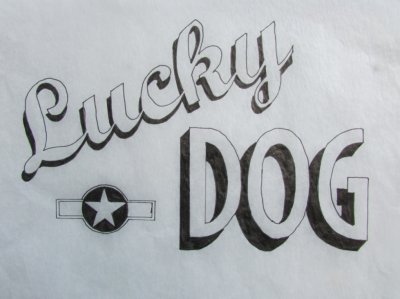
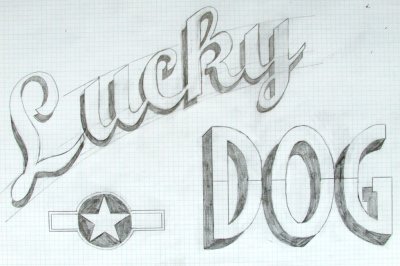
So my first design for Lucky Dog (on paper) ...
View attachment 32614

But - suddenly- I was unhappy with the “L” and felt that it needed to be bigger … and I didn't like that the "Lucky" was angled but straight - I wanted it angled and curved - like Shack Rabbit. And I wanted it larger overall.
So I re-worked it for the third time!

Let's get to business.

Get your paints and art supplies

I would point out here that there are two steps to cover: the design side of things and the painting side.
I would first suggest that you just get the design-side supplies first and try making your design and see how that goes first. Perhaps it doesn't come together as you'd imagined and it just doesn't look right as you'd planned/hoped? If so, there's no wasted money on paints and mediums. So head on down to your local art shop and get what you need ...

The Design work will need:

Graph-Layout paper
Rulers - straight (perhaps with a T-square on the end) and perhaps curved/flexible if you require one.
Mechanical pencil (0.5mm)
Erasers (with a point)
(Cephalometric) Tracing paper/Acetate sheets
0.3mm, 0.5mm and 0.7mm permanent drawing pens

The painting work will need:

A piece of hardboard upon which to mount/zip your jacket around and keep your back panel flat (hardware store for that)
A stretched canvas - if you want to experiment and have a dry-run - or make some wall art!
Artist paints: Acrylics and/or oil paint
Artist paint brushes
Tension Breaker/Flow Improver/Retarder (for acrylics) or Oil Painting Medium I (for oils)
Varnishes (matt/satin)
A mixing palette/pad or white tile
Q-Tips

Create a stencil


So make your design - I suggest graph-layout paper for this as it will help you keep your vertical lines vertical and you horizontal ones horizontal. It all helps.
Having made your design, you will then need a stencil to work from.
A stencil is a guide that you will make and one that represents your final work and that you will work from on your jacket. With just a few good quality permanent-ink design pens and a ruler, you can draw it on a piece of paper to make your original design.
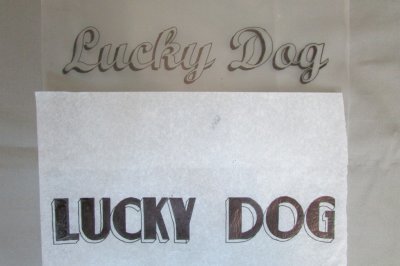
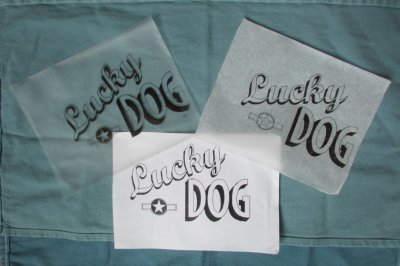
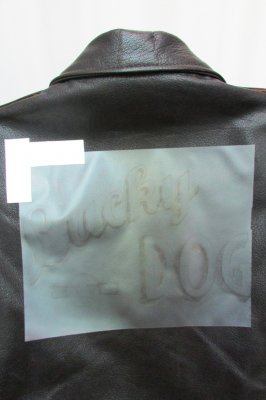
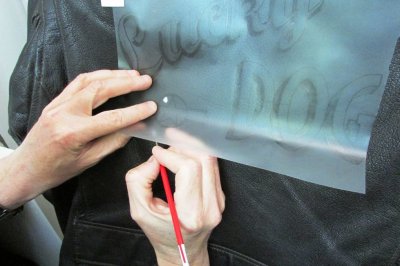
From that you can trace it and make your stencil – using tracing paper, or much better still, a sheet of clear acetate (that you used to see at school/college for OHP presentations. Remember those before PowerPoint?!). In this instance, I’m using some Cephalometric Tracing Paper acetate sheets. Cheaper than art supply store equivalents, it can be obtained online from dental supply companies (e.g. Bracon Dental in the UK, TP Orthodontics in the USA) in pads. Just Google it. It’s what I used to use at work in another hospital for all their pre-surgical orthognathic surgical planning for the dental surgeons - meaning I would mark all the anatomical landmarks on skull x-rays and trace their pre- and post-surgical relationships for jaw reconstruction planning. So you can see that all this isn't a million miles different from that - except now all that is done on computers, so that's seriously old school. With your design neatly laid out on it, you will be able to carefully place it on your jacket, fixing just one side with masking tape so that it is fixed and doesn't move too much - and then you will be able to turn it back and forth like a page - like the old animators used to - so you can lift it back to add paint, then accurately locate it back in place and see through it and see what you are doing on the jacket itself and see your progress.
Spend time making as neat a stencil as possible – it will be your essential guide and you will rely on its accuracy to the Nth degree. After all, why mark anything on a stencil if you aren’t going to follow it precisely? So invest some time in making it as accurate as you can. If you make a mistake, try correcting it or start afresh on another sheet - but make it accurate! (so you'll need a good number of sheets to allow for mistakes - hence get a pad of sheets, not one single piece from an art store which will be expensive).
N.B. Do note that a little imperfection or irregularity is fine in your finished work. If you look at original A2s and their jacket art, they aren’t perfect as they were done by hand and by amateurs. These days, professionally rendered jacket art - like that on Buzz Ricksons A2s - can be that bit too neat (to me) and look like a decal (even though it isn’t) and may not quite have the desired effect you’re after.

View attachment 32610
The Lucky Dog design on an acetate sheet, a sheet of tracing paper and on paper - to show you how different they are and you can determine your own preference. I used to use tracing paper - now I prefer acetate.

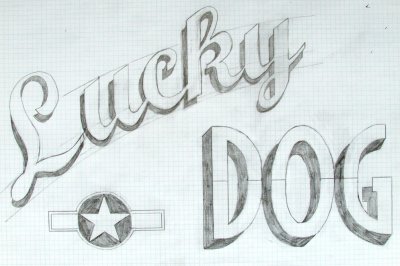
View attachment 32611
The final draft of Lucky Dog as seen on the layour/graph paper.

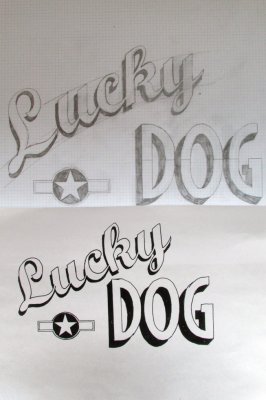
View attachment 32612
Here you can see the difference between the first and second draft of my design.

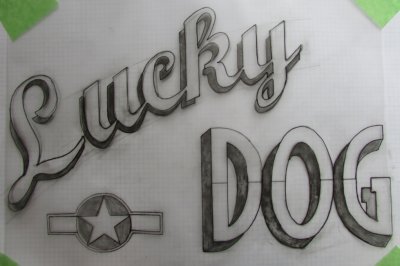
View attachment 32613
The stencil being drawn up - the acetate sheet being fixed in position over the graph paper with masking tape.

View attachment 32632
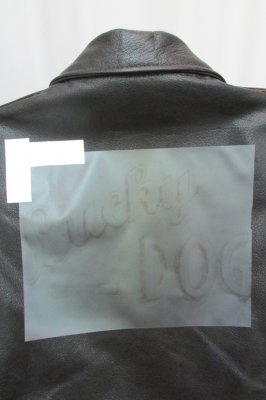
And the finished template set on the jacket - making sure it is central and horizontal!

So when you're happy with your stencil, then we can move on - to the painting!

End of Part 2.
 

Attachments

  • LuckyDogStencils.JPG
    LuckyDogStencils.JPG
    172.3 KB · Views: 1,704
  • LuckyDogFinalDraft.jpg
    LuckyDogFinalDraft.jpg
    795 KB · Views: 1,692
  • LuckyDofFirstDraft2.JPG
    LuckyDofFirstDraft2.JPG
    162.8 KB · Views: 1,669
  • LuckyDogStencil#2.JPG
    LuckyDogStencil#2.JPG
    137.5 KB · Views: 1,682
  • LuckyDogStencil.jpg
    LuckyDogStencil.jpg
    145 KB · Views: 1,701
  • StencilReady.JPG
    StencilReady.JPG
    155.4 KB · Views: 1,437

Stand By

One Too Many
Messages
1,741
Location
Canada
So ...Painting (and, as I'm limited to 10,000 words per thread, this is in two parts to illustrate what I'm on about).

In WW2, the nose and jacket art works were done with whatever paint was to hand on the base. This was usually enamel or similar oil-based paint and in limited supply and so there wasn't a lot of range of colours. And not every base had a competent artist - the job sometimes just fell to whoever showed even a glimmer of talent, and so the quality of works varied enormously from the rough and basic through to the truly amazing and artful.
The ladies at Hibbert Bros. told me that I could use artist acrylics and/or artist oils. Now, back then, this was all new to me. I was a seasoned aircraft model builder, having made models all my life since I was 6, but had only ever used enamels (hand-brushed and airbrushed) - so I felt really quite daunted by this.
"Don't worry. You can do this", they said. And you can too.

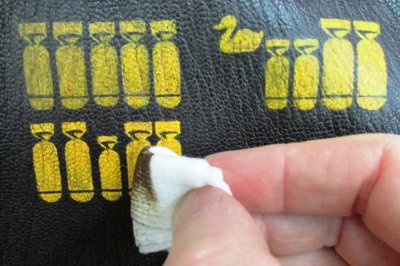
Artist acrylic paints are easy. They go on smoothly and set very quickly and can be over-painted in minutes. Being water-based, any mistake can be removed quickly with a wet cloth or Q-Tip. Note that acrylic paints are sold in varying degrees of quality; namely student grade and professional grade. Student grades are for students who typically have less money to spend, so the quality of the pigments and fillers is reflected in the lower price. My advice: Get the professional grade as this is a design you only intend on doing once and it should be the best it can possibly be and it's a precious A2 we're talking about here! Invest in the best.
You will first need to paint a white base on the jacket in the shape of your design - to get the colours to stand out and work properly. You could use gesso (in the same manner as artists use it on canvas) as it is white and flexible, but a simple white acrylic base will work just fine and is what I use.
A word on additive mediums:
You will need to add Tension Breaker - this does a couple of things: it lowers the surface tension of the acrylic paint and improves the bond to the fabric and it also helps the paint to flex - so it won't crack as the jacket bends. I used one by Rowney back then. These days, as far as I know, only one company (Matisse Derivan) in Australia still makes it under the name of Surface Tension Breaker and I got mine from Oz online. Windsor & Newton also makes Flow Improver and it too is designed to help the acrylic flow (as the name says!) and help you get a nice, neat "hard edge" with the acrylic paint - and I once called the rep at the factory and told him about my old Tension Breaker and he said it was the same thing and the same formula.
Another medium to consider is Retarder. As I mentioned, acrylic paints set quickly which can be a bonus - but depending on the day and what you are doing, they can set a mite too quickly - especially if you are trying to take your time and blend some nice flesh tones or something similar. Retarder is a medium that slows the drying and allows for some extra working time.

Artist oil paints work very well too but, whereas the acrylics set in minutes, oils can take a week. Yes, a week. This is great if time is not important as they are immensely forgiving and you can easily remove mistakes with a Q-Tip or soft cloth and adjust your work as you go and review/correct it over days. If you need to speed certain colours up, you can add some Japan Drier which halves the drying time to a few days, but do be sure to use this in a well-ventilated area as it's a bit toxic and harmful to the ol' lungs. Oils have equally good permanence too.
If you're doing a pin-up girl and want nice, blended flesh tones with no brush marks, oils would be a good choice. And that’s where oils are useful – they allow you time to work and get nice blends whereas acrylics set too quickly.
Use a tension breaker of course – and in this case, you’d want something like Oil Painting Medium I by Grumbacher.

“How do I choose what paint medium I should use?” I hear you ask.
Well, that depends on what you are wanting to do.
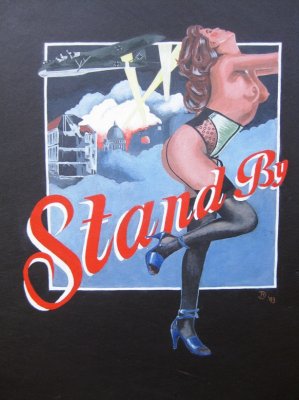
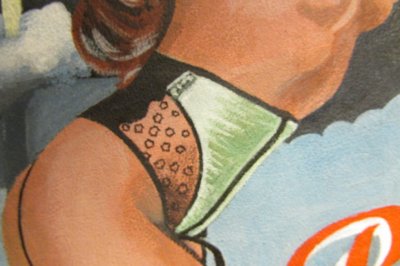
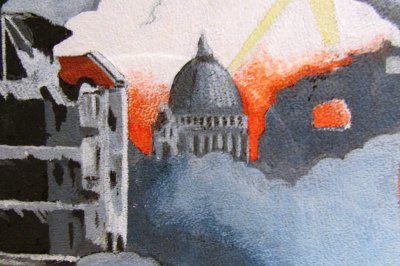
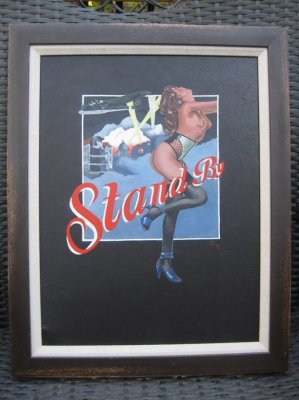
Let’s look at my very first work “Stand By” as an example:

View attachment 32647

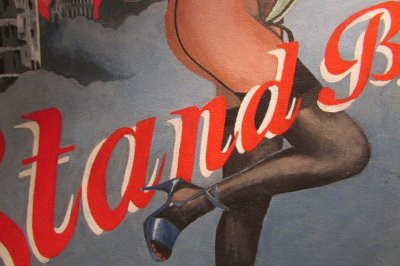
The lettering was done in acrylics and they’re very opaque and go on well, there's no blends of colours required and are ideal for this - but the pin-up girl and smoke was all done in oils.

View attachment 32648 View attachment 32650 View attachment 32652

Note the flesh tones of the girl and how they are nicely blended from the highlights down to the shadows. Oil paint allows you lots of time to blend paint nicely and erase any mistakes or brush strokes. Being more translucent, you may need to use a couple of coats of oil paint flesh tones, but that’s okay. Take the time. The result is worth it! Begin by getting a basic flesh tone paint colour and putting that down as a base and letting it dry. Then work the other flesh tones (cool and warm crimson tones, highlights, shadows) on top. Flesh tones are tricky but oils will allow you to practice and develop your skills as you go. There are also kits of flesh tones in hobby stores and they will give you an idea of the colours you should emulate, as well as some good how-to guides in model forums.
Note also too the smoke – you will notice that it goes from a darker blue-grey at the bottom corner of the work and changes gradually and seamlessly to a lighter blue-grey as it gets higher and the perceived light changes. Again, it’s a seamlessly smooth blend of hue and value which could only be done with oil. Acrylics would set far too quickly on you and make hiding brush strokes very difficult. St. Paul’s cathedral and the bombed out buildings were also done in oils.
The Messerschmitt Me- 323 “Gigant” and spotlights were all done in acrylics. The white cloud is simply the white base coat.
Note that you can paint oil paint on top of acrylic paint but it can sometimes be tricky to put acrylics on top of oils, so if you’re not sure, try to keep them separate if possible.
And finally, note that Stand By was done during the hot summer of 1993 after work and at weekends – and it took me 6 weeks to do - that's including lots of drying time plus a week of waiting for it to dry to a full cure before I added a varnish coat.

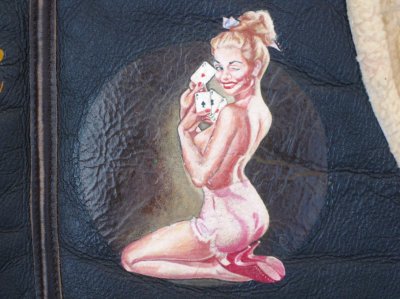
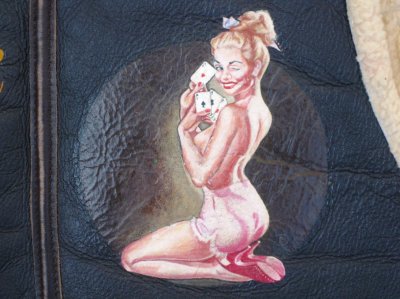
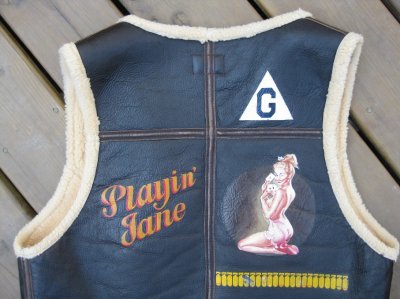
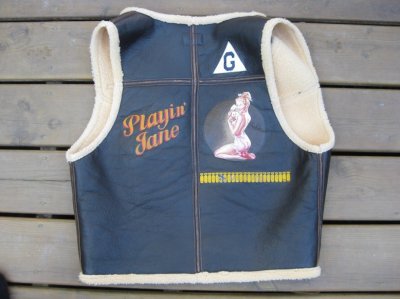
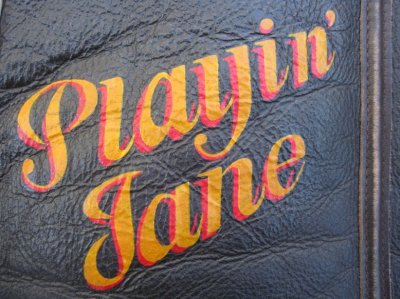
Another example here is the pin-up girl by K.O. Munsen that I painted on my ELC C-3 and I entitled “Playin’ Jane”.

View attachment 32654

And we'll look more closely at that and other works before we get to putting brush-to-leather and truly committing ourselves ...

End of Part 3.
 

Attachments

  • StandBy2.JPG
    StandBy2.JPG
    154.2 KB · Views: 1,477
  • StandByDetail#1.JPG
    StandByDetail#1.JPG
    229.1 KB · Views: 1,445
  • StandBy.Detail2.JPG
    StandBy.Detail2.JPG
    157.2 KB · Views: 1,438
  • StandByDeatail3.JPG
    StandByDeatail3.JPG
    222 KB · Views: 1,455
  • StandBy1.JPG
    StandBy1.JPG
    133.2 KB · Views: 1,462
  • Playin'Jane.JPG
    Playin'Jane.JPG
    242.5 KB · Views: 1,467

Stand By

One Too Many
Messages
1,741
Location
Canada
So here we are at our last stop before we get busy and take an indelible step forward ...
Up to now, it's all been quite exciting and fanciful wishful thinking - but harmless. And we're about to cross that threshold, so I thought I'd add just a few final words on painting before we do that, so that you, gentle reader, may feel as prepared as possible.

As I said, here's Playin' Jane as seen on my ELC C-3.

View attachment 32722 View attachment 32723 View attachment 32724 View attachment 32725

Again, the flesh tones were done in oils.

Get good quality artist brushes - from an art shop, not a hobby store. There's a big difference in quality and a poor brush will hamper your ability to pull this off. And if you invest in good quality brushes and paints, with dutiful care, they can last for future projects.
Your canvas is the rear panel of your jacket and, like any canvas, it needs to be held flat and taught - so get a piece of hardboard or ply-wood of an appropriate size on which you can put your jacket on and then zip it up on the other side to make it snug so it won't move. The one I use is 18” x 24”.
Then you are going to tape your stencil to the back panel, making sure it is placed precisely where you want it and at the correct rotation - and then very gently and lightly rub the precise area to be painted with some fine sandpaper just to prep the surface and give it a little "tooth" - and brush away any debris. Alternatively, clean the area to be worked on with just a little alcohol - just a wee bit! One pass is all I'm talking about. Do not use acetone - it's far too harsh and will remove the colour of the tanning as well as everything else! So very carefully does it and you are ready to go.

And then comes the very hardest part: putting that first touch of the brush and the paint to the jacket!
Up to that point, it's all just been quite exciting dreaming and planning and design and prep work - and you could always change your mind about it all with no harm done.
But committing that first paint stroke ... I do say it requires a certain leap of faith and - and yes, you could be about to ruin your jacket.
But you won't know if you don't try!

But what's the worst that can happen?
If it all looks wrong, just keep painting over and correcting what you've done until it looks right. Don't give up at the first fallen fence. Have another run at it.
A long time ago and after making models for many years (since I was 6) and developing my skills, I once made a Tamiya 1/350 Bismarck battleship and made a truly terrible job of the splinter camouflage. It totally surprised me - I thought it was a challenge that was well within my abilities. It looked really awful to me - and I really thought my modelling mojo had suddenly upped and gone. Seriously, I did. I was gutted. But the kit was expensive to me and so I took a deep breath and a good step back. I stripped all of the paint back to the bare plastic, carefully sanded everything smooth and re-primed and had a fresh crack at it - and I astonished myself as it turned out beautifully! I couldn't believe that the second run was as good as the first one was terrible. Such is the power of patience and perseverance! Had I not tried again, I would have given up there and then and have decided that that was my limit of ability - which it certainly was not!
But that said, if it looks disappointingly bad in the end and the job appears to be more than you're capable of, you can always pass the job on to an artist to paint over ... but you may just astonish yourself, as I did with Stand By!
"Baby steps" suggestion: You could always start by testing your painting abilities with just attempting a name in a nice 1940s/1950s/military font with a couple of the colours you like - keeping it simple - and you could always have a test-run on a piece of stretched canvas in a wood frame from an art store. They are cheap and canvas has a nice grain somewhat similar to goatskin. Just paint on a white base and add a few coats of brown in a matching tone to your jacket and it will look like your jacket's back panel - and paint on that as a safe dry-run. And if it turns out well, you'll have a nice piece of wall art! (and one that could go in a bathroom like my Stand By. No amount of steam from the shower can make it warp!). But bear in mind that your commitment level will be less with a stretched canvas - if you think things aren't going well, you might decide to quit earlier as there's less incentive to keep going and try harder ... But it could be a case of better safe than sorry. Only you can know.

Note that painting on horsehide gives you a superbly smooth canvas to paint and work on.
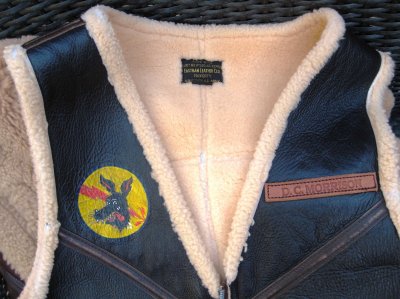
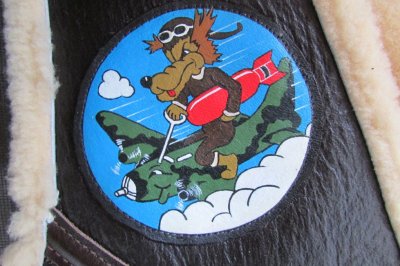
Steerhide is almost as fine and is just as good for this. The patch below of the 729th BS was made on a piece of my old Aviation Leathercraft A2 and is on my girlfriend's ELC C-3. As you can see, it's a good way to get a neat patch on to an otherwise rough hide like sheepskin.

View attachment 32727

Goatskin is naturally pebbly by nature and is slightly more challenging and makes fine work look a hint less straight in fine detail, but as original goatskin A2s were painted, so can yours be. It shouldn't stop you by any means.
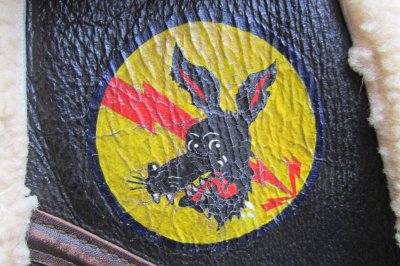
Sheepskin, however, has a lot more texture and offers extra challenges to get straight lines looking straight - and I can't recommend it. The 364th BS patch below has worn appreciably due to the texture of the hide.

View attachment 32726 View attachment 32728

So, that's the theory all done.
Now to the practical part - and painting on the jacket!

End of Part 4.
 

Attachments

  • Playin'Jane.JPG
    Playin'Jane.JPG
    242.5 KB · Views: 1,453
  • Playin'Jane2.JPG
    Playin'Jane2.JPG
    231 KB · Views: 1,425
  • ELCC-3#1.JPG
    ELCC-3#1.JPG
    129.9 KB · Views: 1,418
  • ELCC-3#3.JPG
    ELCC-3#3.JPG
    200.8 KB · Views: 1,393
  • ELCC-3#4.jpg
    ELCC-3#4.jpg
    588.6 KB · Views: 1,402
  • 729thBSpatch.JPG
    729thBSpatch.JPG
    230.9 KB · Views: 1,460
  • 364thBSpatch.JPG
    364thBSpatch.JPG
    276.8 KB · Views: 1,428

Stand By

One Too Many
Messages
1,741
Location
Canada
So, here we are - painting at last!

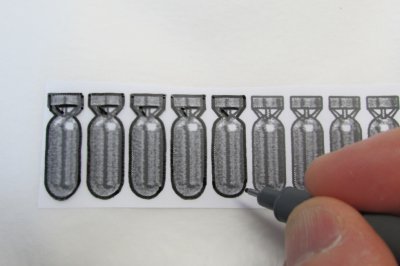
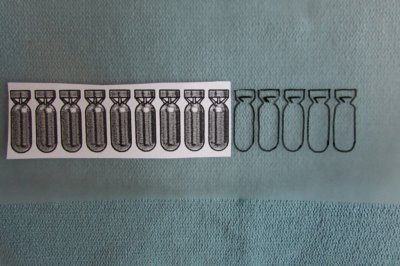
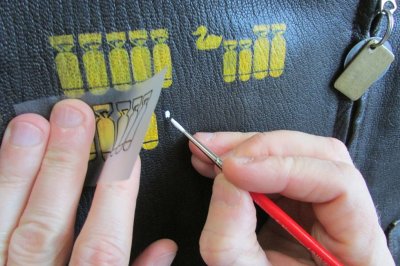
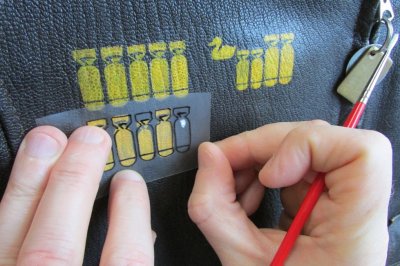
So you should have a stencil made, and to re-cap, here I am making my mission tally stencil:

View attachment 33003 View attachment 33004

As I said, you first need to create a white backdrop to your work in the shape of your letters or chosen design - to make your colours work properly. Try painting any red onto a backdrop of dark bitter chocolate- or seal brown-coloured piece of leather and you will instantly see it disappear into it and it will be almost indiscernible. However, try painting it on a white base and you will make the colour "pop" straight away.

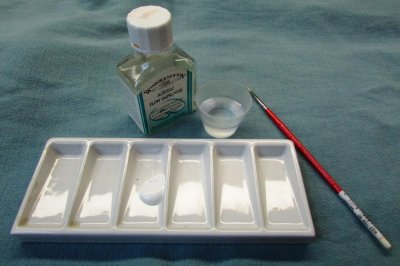
So, first you prepare some Flow Improver (10% to water by volume) and you will use that and mix into your white paint.

View attachment 33002

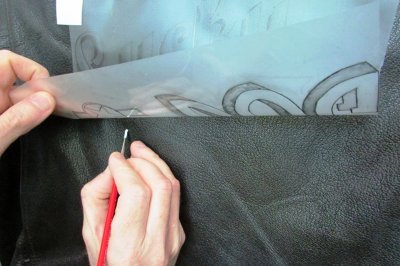
With your brush loaded appropriately, hold your stencil on your jacket and make a careful mental note of a position within the outline of the letter or design – keeping your eye on where that was on the jacket, flip back the stencil (like an animator of old) and put a touch of white paint where your mental note told you it would be. Carefully replace the stencil back over your mark of paint (being careful not to smudge the paint and get it on your stencil - but if you do, it just wipes off with a wet Q-Tip) and you should see the outline of the letter or design safely around it. Hopefully you got that right.
If you didn't, lift the stencil away from the paint and quickly remove the paint with a wet cloth or Q-Tip - and try again.
If you did get it right, you are on your way!
Add more paint towards the outline of the letter you want, continuing until you get precisely to the border outline as per your stencil.

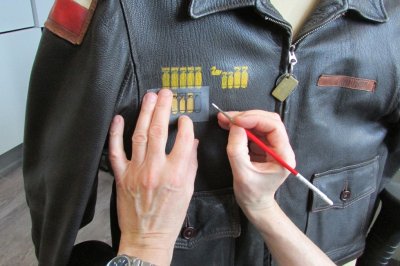
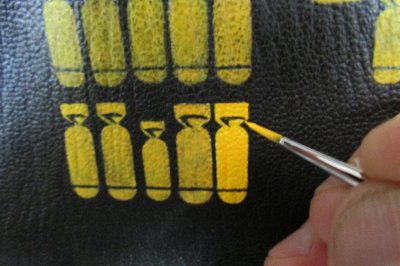
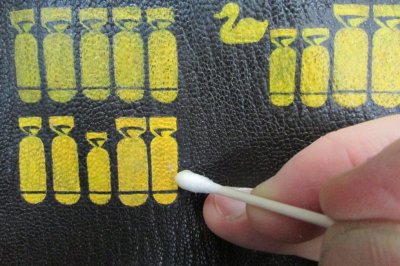
To demonstrate this, I shall now add a mission tally to the front of the jacket (because we rescued a dog with a desperately sad tale from Mexico, so this jacket is a work in continual progress!).
So to recap, I have my stencil ready and have it in place.

View attachment 33005
View attachment 33006

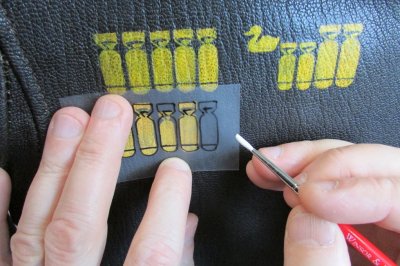
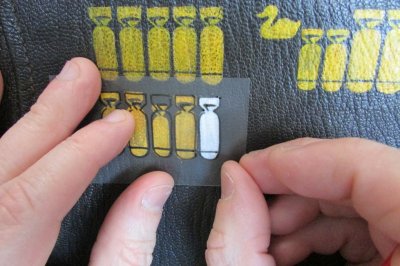
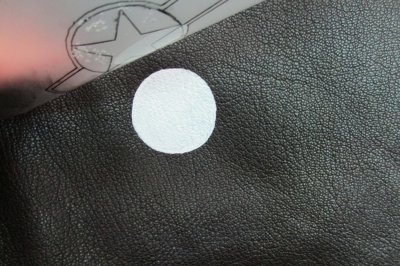
Then I lift back the stencil … and add my first dab of white – as a landmark of sorts.

View attachment 33007

Then I replace the acetate sheet and want to see that the landmark I made is inside the outline of the bomb shape.

View attachment 33008

Then I lift the acetate and add more paint towards the edge of my bomb outline.

Then keep going, working the stencil back and forth as you review your progress.

View attachment 33009

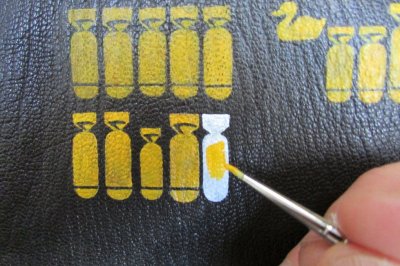
Continue to flesh out that letter/bomb tally/design until you have that silhouette complete. Then allow to dry (an hour for that first coat should be fine).
Then I add the Cadmium Yellow Deep.

View attachment 33010

And I fill in the entire sihouette.

View attachment 33011

And I add a touch of Dark Umber/Mars Black to fill in the detail.
When it is dry, I go over again with a little Cadmium Yellow Deep to bring in the edges on the black detail and make it tidy.

View attachment 33015

So using that same back-and-forth animator-style technique with the stencil to verify what you're doing, start doing the same with any other colours in the design. You will be amazed by how quickly you make progress.

View attachment 33012

And if you make an error on the jacket by accidentally making the border too big or not straight enough and you wish to correct it but the paint has dried, then get the colours you'll need to match the colour of the hide of the jacket and paint over your mistake - so you're erasing your work that way, from the outside in towards the border on your stencil . Note that this colour-matching is tricky but very achievable. I know, I’ve done it. The paint will dry matt and the jacket will have a gloss/semi-gloss finish to it, so you will need to restore that satin finish over your correction to blend it in. More on that later ...

Also, the mission marker is looking very clean and bright at this point - and I will be toning it down with some "weathering" or "aging" to blend it in with the others. How I do that will be covered later in a section by itself.

And that's the basic principle of using the stencil and using the painting technique that I use.

So, next we move on to something a bit more advanced - but extending the same principles - and Lucky Dog …


End of Part 5.
 

Attachments

  • FlowImprover.JPG
    FlowImprover.JPG
    218.7 KB · Views: 1,421
  • MissionTallyStencil#1.JPG
    MissionTallyStencil#1.JPG
    126.4 KB · Views: 1,415
  • MisionTallyStencil#2.JPG
    MisionTallyStencil#2.JPG
    217.1 KB · Views: 1,454
  • MisionTallyStenci#4.JPG
    MisionTallyStenci#4.JPG
    220.8 KB · Views: 1,425
  • MisionTallyStenci#5.JPG
    MisionTallyStenci#5.JPG
    243.8 KB · Views: 1,429
  • MisionTallyStenci#6.JPG
    MisionTallyStenci#6.JPG
    229.5 KB · Views: 1,417
  • MisionTallyStenci#7.JPG
    MisionTallyStenci#7.JPG
    237.9 KB · Views: 1,365
  • MisionTallyStencil#10.JPG
    MisionTallyStencil#10.JPG
    217.6 KB · Views: 1,395
  • MisionTallyStencil#11.JPG
    MisionTallyStencil#11.JPG
    249.6 KB · Views: 1,404
  • MisionTallyStencil#13.JPG
    MisionTallyStencil#13.JPG
    221.8 KB · Views: 1,397
  • MisionTallyStencil#15.JPG
    MisionTallyStencil#15.JPG
    267.8 KB · Views: 1,354
  • MisionTallyStencil#14.JPG
    MisionTallyStencil#14.JPG
    185.5 KB · Views: 1,370

Stand By

One Too Many
Messages
1,741
Location
Canada
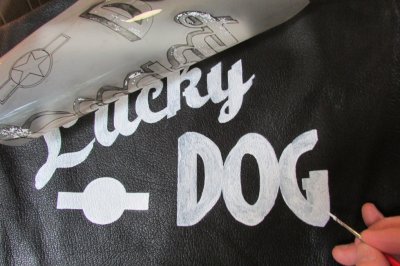
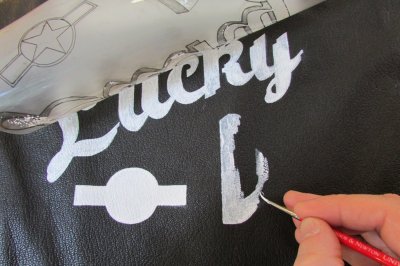
So here we are at last - painting Lucky Dog on the back panel of my Aero ANJ-3 and, like the mission tally marks, we begin with painting a white base in acrylic paint. This is no different to what you've seen so far - it just expands on the same principles.

View attachment 33619
First, make sure your stencil is placed centrally and has the correct rotation. Most important! You don't want to discover that slight mistake later on ...!

View attachment 33620
Then comes perhaps the hardest part - putting that first touch of paint on the jacket. It's not easy - as it requires a definite leap of faith and, once done, you're committed.
But once on, the anxiety passes - and then it's a matter of being in for a penny and in for a pound - and you're on your way and it becomes simply a matter of seeing this through to the end.

View attachment 33621
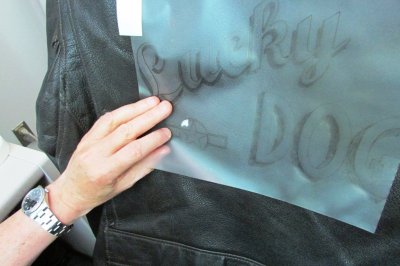
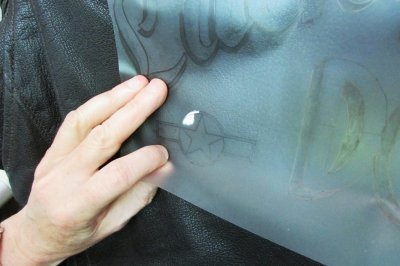
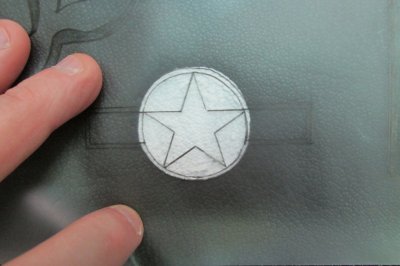
So here I am using the stencil to create the USAAF "star and bar" which will act as a trig-point or land-marker for the rest of the stencil to make sure that it is accurately replaced each time.

View attachment 33622
And I just add in more acrylic to flesh out the white circle.

View attachment 33623

View attachment 33624

View attachment 33625
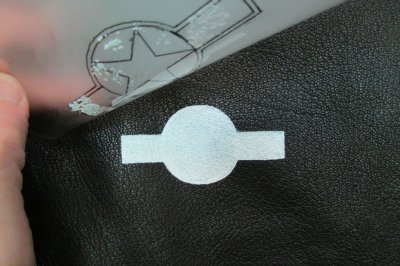
So keep verifying your progress with the stencil. So now it becomes very clear why an accurate stencil is so helpful!

View attachment 33626
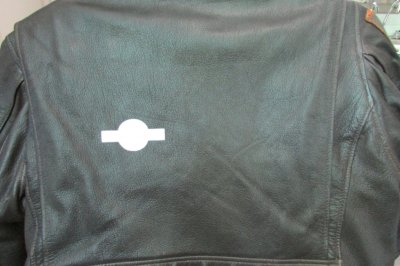
The "bar" added. Baby steps, you see.

View attachment 33627
So the "star and bar" is all done. Now to work on Lucky ...

View attachment 33628
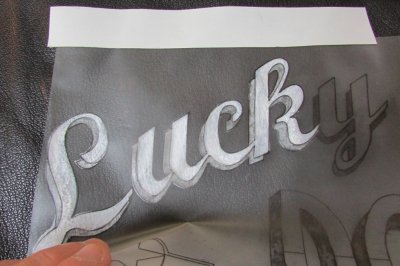
And just keep working that stencil back and forth like an animator's page and keep going - just as with the tallies ...

View attachment 33630

View attachment 33629
So getting to the end of the first coat of white paint - and a second coat all over is required.

View attachment 33631
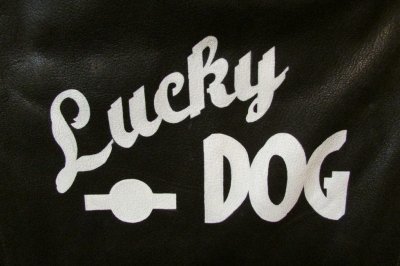
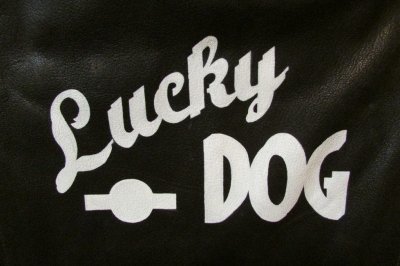
Ta-Daaah!
In this shot, the DOG part looks crooked - that's just the jacket not lying flat for the photo (I'm doing all this myself - holding the paint brush and taking photos!) - but it is straight.

So the base is done!
Next we start adding colours!

End of part 6.
 

Attachments

  • LuckyDogProgress#1.JPG
    LuckyDogProgress#1.JPG
    145.7 KB · Views: 1,332
  • LuckyDogProgress#2.JPG
    LuckyDogProgress#2.JPG
    221.1 KB · Views: 1,342
  • LuckyDogProgress#3.JPG
    LuckyDogProgress#3.JPG
    202.7 KB · Views: 1,311
  • LuckyDogProgress#4.JPG
    LuckyDogProgress#4.JPG
    192.3 KB · Views: 1,318
  • LuckyDogProgress#5.JPG
    LuckyDogProgress#5.JPG
    186.4 KB · Views: 1,305
  • LuckyDogProgress#6.JPG
    LuckyDogProgress#6.JPG
    277.2 KB · Views: 1,320
  • LuckyDogProgress#7.JPG
    LuckyDogProgress#7.JPG
    140.5 KB · Views: 1,314
  • LuckyDogProgress#8.JPG
    LuckyDogProgress#8.JPG
    230.2 KB · Views: 1,315
  • LuckyDogProgress#9.JPG
    LuckyDogProgress#9.JPG
    219.6 KB · Views: 1,302
  • LuckyDogProgress#10.JPG
    LuckyDogProgress#10.JPG
    193.3 KB · Views: 1,308
  • LuckyDogProgress#11.JPG
    LuckyDogProgress#11.JPG
    227.1 KB · Views: 1,309
  • LuckyDogProgress#12.JPG
    LuckyDogProgress#12.JPG
    231.7 KB · Views: 1,328
  • LuckyDogProgress#13.JPG
    LuckyDogProgress#13.JPG
    193.9 KB · Views: 1,327

Stand By

One Too Many
Messages
1,741
Location
Canada
So having got the design mapped out in white acrylic paint as a base, now we move on to adding the colours ...

View attachment 33838
So this is as far as we got from the last time and now we are ready to proceed with colours.

View attachment 33839
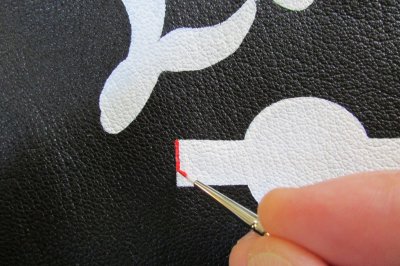
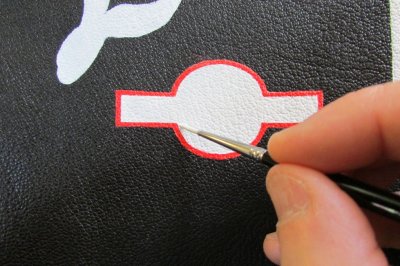
So now I add some Cadmium Red Deep for the border ...

View attachment 33840
With a steady hand, that's completed.

View attachment 33841
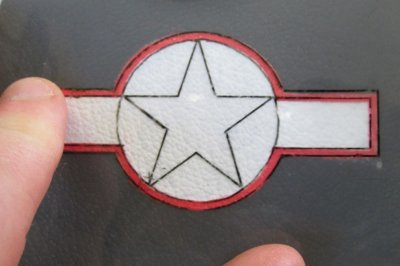
Then overlay and check your stencil to reference that you kept everything neat and the border has an equal width and is proportioned just as you intended and designed.

View attachment 33842
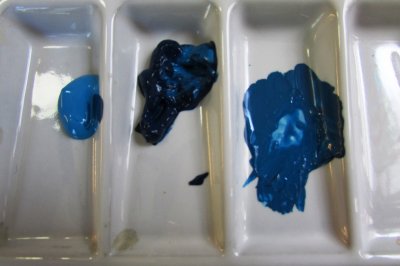
To get the blue colour I wanted, I mixed some Indianthrene Blue with some Brilliant Blue (with Flow Improver of course) and adjusted it until it was the shade I wanted (right) - then I applied it in the spaces of the USAAF emblem according to the stencil.

View attachment 33843
Et voila, adding the blue forms the star.

View attachment 33845
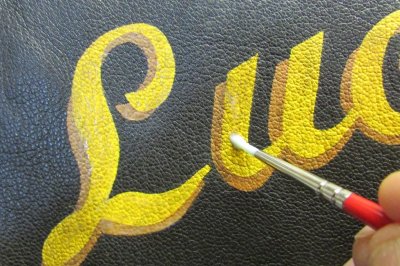
So then I applied a light coat of the colours I'd chosen for Lucky Dog - namely the Cadmium Yellow Deep plus Burnt Sienna - and I do this to put a base coat of colour down, but also, so I can review the colours to decide if I like them as much as I thought I would ...

View attachment 33844
Hmmm....

View attachment 33845
Hmmmm.... and I'm thinking "not quite" at this point.

View attachment 33846
Then I add a second coat of Burnt Sienna to be sure and, over the first coat, suddenly the colour has opacity and starts to work, but I'm not liking it. I'm thinking that it's too dark for a drop-shadow and won't be as apparent as I'd hoped, being too subdued on the dark leather background - especially when it's "aged" and darkened too.

View attachment 33847
So I complete the L in Burnt Sienna, but I do the U in Raw Sienna - to compare the two against each other ...

View attachment 33848
I prefer the Raw Sienna! And that's the beauty of the acrylic paints - made a mistake? Paint over it!

View attachment 33849
So then I paint Raw Sienna over the Burnt Sienna ...

View attachment 33851
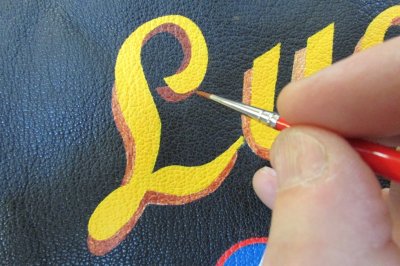
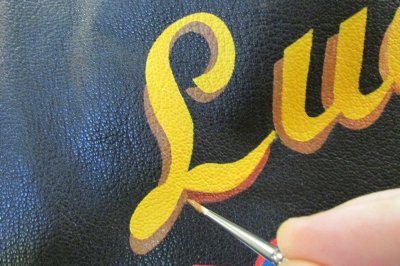
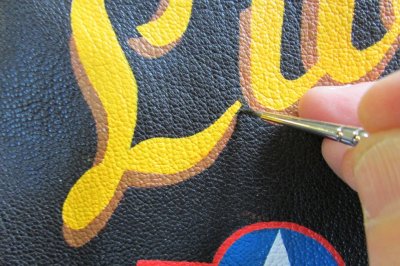
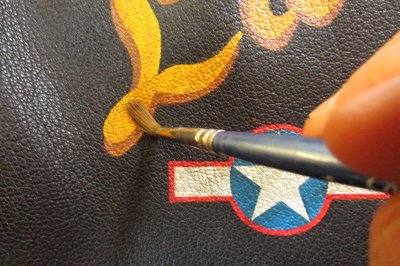
Working inwards with a little Mars Black/Dark Umber to make the edges really neat.

View attachment 33850
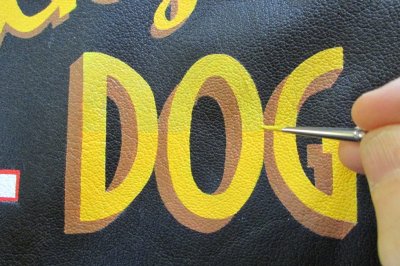
A little bit of Turner's Yellow over the Cadium Yellow Deep to accent the upper half of DOG a la "Shack Rabbit".

View attachment 33853
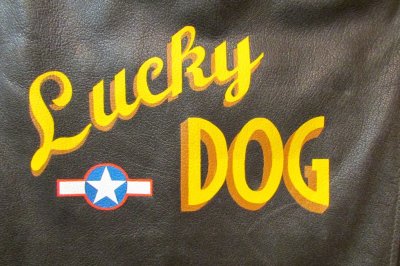
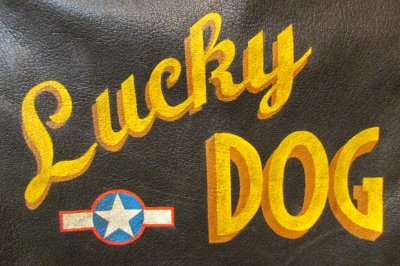
And then the colours are done! Here it is outside (and the art looks a lot brighter than it actually is!).

View attachment 33852
But of course, I know what you're thinking - it looks very new and fresh - not vintage at all. Very true and it's really not what we're after ... yet.
So next we'll add some dark washes and "age" and "weather" the art and really tone it down and make it go from that ...

View attachment 33854
To this … and how we do that will be covered in the next - and final - instalment of the process.

We're nearly there - and we're on the home straight …!


End of Part 7.
 

Attachments

  • LuckyDogColour#1.JPG
    LuckyDogColour#1.JPG
    193.9 KB · Views: 1,325
  • LuckyDogColour#2.JPG
    LuckyDogColour#2.JPG
    259.1 KB · Views: 1,288
  • LuckyDogColour#3.JPG
    LuckyDogColour#3.JPG
    252.6 KB · Views: 1,323
  • LuckyDogColour#4.JPG
    LuckyDogColour#4.JPG
    132.2 KB · Views: 1,290
  • LuckyDogColour#5.JPG
    LuckyDogColour#5.JPG
    135.8 KB · Views: 1,324
  • LuckyDogColour#6.JPG
    LuckyDogColour#6.JPG
    282.7 KB · Views: 1,306
  • LuckyDogColour#7.JPG
    LuckyDogColour#7.JPG
    184.9 KB · Views: 1,328
  • LuckyDogColour#8.JPG
    LuckyDogColour#8.JPG
    291.2 KB · Views: 1,296
  • LuckyDogColour#9.JPG
    LuckyDogColour#9.JPG
    248.7 KB · Views: 1,289
  • LuckyDogColour#10.JPG
    LuckyDogColour#10.JPG
    229.8 KB · Views: 1,300
  • LuckyDogColour#11.JPG
    LuckyDogColour#11.JPG
    276.4 KB · Views: 1,279
  • LuckyDogColour#12.JPG
    LuckyDogColour#12.JPG
    268.4 KB · Views: 1,270
  • LuckyDogColour#13.JPG
    LuckyDogColour#13.JPG
    291.8 KB · Views: 1,262
  • LuckyDogColour#14.JPG
    LuckyDogColour#14.JPG
    282.7 KB · Views: 1,284
  • LuckyDogColour#15.JPG
    LuckyDogColour#15.JPG
    291.3 KB · Views: 1,303
  • LuckyDogColour#16.JPG
    LuckyDogColour#16.JPG
    226.9 KB · Views: 1,329
  • LuckyDogColour#17.JPG
    LuckyDogColour#17.JPG
    285.1 KB · Views: 1,295

Stand By

One Too Many
Messages
1,741
Location
Canada
So here's the story so far:
View attachment 34299

Now, once the job is done, it will of course look a bit bright and fresh to you – and you may wish to tone it down and “age” it - perhaps slightly, maybe more so. This is easily done in two ways: dark wash filters and/or dry brushing techniques.

Dry-brushing technique
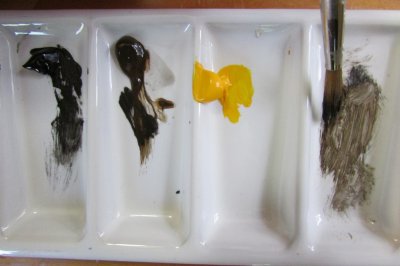
Simply take some of your base colour that you are working with and, using water/Flow Improver as a medium, mix it with some Raw Umber (dark brown) and some Mars Black oil paint and, with a medium-sized brush, then rub the brush on your palette or a piece of paper, so that most of the paint is gone. With just a hint of it left, quickly and lightly rub it over your work and it will take the tone down a degree.
If you see an obvious brush stroke that you'd prefer didn't look like an obvious brush stroke, don't panic - rub it off and blend it out with a moistened Q-Tip, then add a bit more dry-brushing if you need to. Carefully does it at this stage. And remember that your work will age and fade with time too, so don’t over-do it.

View attachment 34302
The paint prepared for dry-brushing.

View attachment 34303
The paint being applied. Do this using quick, light and random strokes.

Dark wash technique
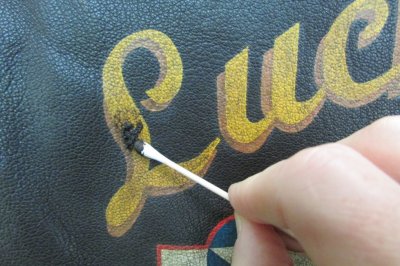
You could also make a wash of dark brown/black paint and water/Flow Improver – and with a paint brush, soak up the brush so it is wet and then randomly dab the design and let the wash flow on your design. You see immediately see how the dark wash collects and settles right into the crevices of the grains making a nice aging effect and the higher points will get a darker tone (but to a lesser degree of course). That will tone it down.
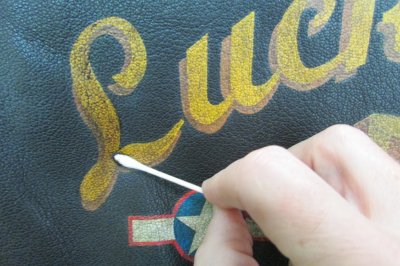
If you over-do it, don’t panic - just use a cloth or Q-Tip with clean water – moist, not wet again – and carefully remove what you’ve done.
Wait a couple of minutes and add more wash if you want to. You can add layers of dark washes until you get the effect/tone you want.
Then let it dry thoroughly.

View attachment 34300
The paint wash is prepared. It looks like a dirty puddle and you may be hesistant to use it at first, but it is only a filter and its effect is subtle. Use more coats over the previous dried one to increase the effect.

View attachment 34301
The first light wash applied. Note how the filter has settled more inbetween the grains of leather - a nice effect.

View attachment 34304
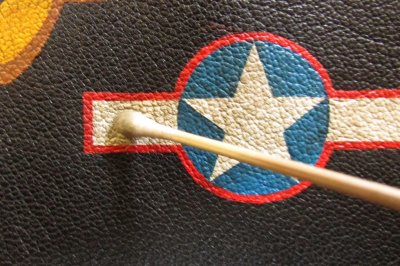
Use a moist Q-Tip to remove any unwanted strokes or paint. Then correct with more wash or dry-brushing if you wish to.

Once the job is completed, after a week's drying to reach a full cure, (the website for Liquitex says 48-72 hours. I say give it more. What's the harm?) you will want to put a single layer of acrylic varnish over your work to protect it. Just one coat is all you need – use more and it will look milky and you don't want that! So less is more in this instance.

View attachment 34308
The matt varnish going on - shiny and milky. This is evident in the photo, but it will dry totally clear and matt, so there really wouldn't be anything to see with another photo of this stage.

Varnishes can be white – but don’t worry. They go on white but dry completely clear.
Varnishes come in matt, semi-gloss and gloss finishes - so you may need to mix a couple together to match the sheen of your jacket if you need to blend any correction you made in with the natural finish of the jacket and achieving this is just trial and error.
Don’t use the Tension Breaker/Flow Improver with your varnish. They're supposed to work fine by themselves but check with the website with whatever brand you've chosen to use.
And finally, I'd wait a week for the varnish to cure before I wore it outside ...

I gave Lucky Dog a nice dry-brushing and a good dark wash – and I considered it finished … and I announced it thusly in the teaser trailer thread.

View attachment 34307 View attachment 34306 View attachment 34310


But still, the art rested on its easel and looked at me here at work for a few weeks ... and no matter how much I had thought it was finished, at the back of my mind, I still felt that it looked too bright to me.

View attachment 34299
Lucky Dog - before any "aging and weathering".
View attachment 34305
Lucky Dog - after "aging and weathering"


So then I decided to age it much further – and I gave it two more dark washes.
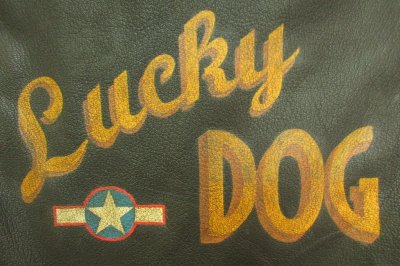
Then, by chance, I took a course on using Annie Sloan chalk paints and I decided to use some of her finishing waxes on it to really darken it even more by using it both as a stain and protective layer (taking the jacket to how it looks today) … and that will be covered in the next instalment.

End of Part 8.
 

Attachments

  • LuckyDogWeathering1.JPG
    LuckyDogWeathering1.JPG
    291.3 KB · Views: 1,321
  • LuckyDogWeathering2.JPG
    LuckyDogWeathering2.JPG
    134.9 KB · Views: 1,319
  • LuckyDogWeathering3.JPG
    LuckyDogWeathering3.JPG
    275 KB · Views: 1,300
  • LuckyDogWeathering4.JPG
    LuckyDogWeathering4.JPG
    139.3 KB · Views: 1,301
  • LuckyDogWeathering5.JPG
    LuckyDogWeathering5.JPG
    271.8 KB · Views: 1,284
  • LuckyDogWeathering6.JPG
    LuckyDogWeathering6.JPG
    278.1 KB · Views: 1,272
  • LuckyDogWeathering7.JPG
    LuckyDogWeathering7.JPG
    272.1 KB · Views: 1,266
  • LuckyDogWeathering8.JPG
    LuckyDogWeathering8.JPG
    226.9 KB · Views: 1,299
  • LuckyDogWeathering9.JPG
    LuckyDogWeathering9.JPG
    318.3 KB · Views: 1,326
  • LuckyDogWeathering10.JPG
    LuckyDogWeathering10.JPG
    317.7 KB · Views: 1,285
  • LuckyDogWeathering13.JPG
    LuckyDogWeathering13.JPG
    227 KB · Views: 1,343

Stand By

One Too Many
Messages
1,741
Location
Canada
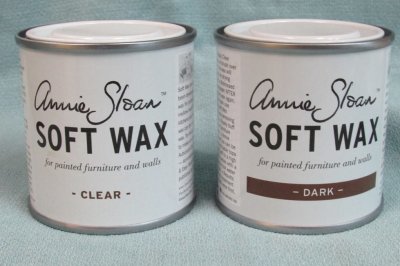
Another way of adding an "aging" effect is to add a coat or two of Annie Sloan “Soft Wax” to add an extra “weathering” effect and tone down the colours further - and to protect the finished art with a light wax coat.
This is something I’ve only recently discovered for myself but I’ve added it to Lucky Dog.

The paints are really great - and the finishing waxes come as a clear coat and as a separate dark coat. They were developed for Annie Sloan’s range of chalk-based paints for home furniture/finishing and they go on to protect them and add a final stain/finish – and they work on all manner of items (wood, metal, plastic, they can even be used to stain fabric and linens) and they work on leather too.

Simply add the clear coat first – apply and wipe away the excess with a soft, lint-free cloth.
Then, after 2 hours, add the dark wax. It goes on rather like shoe polish – and really gets in between the grains and tones down the colours beautifully. Then simply wipe away the excess.
If you add it and then wish you hadn’t, simply apply the clear coat over it and it reactivates the dark coat and you can wipe it away. No harm done. Nobody dies.
And here is the process – and the finished result:

View attachment 34373
The Annie Sloan finishing wax

View attachment 34375
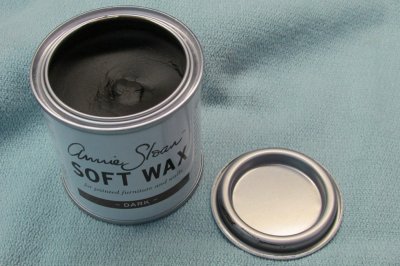
As you see, not unlike shoe polish inside.

View attachment 34385
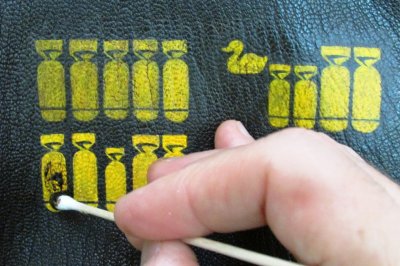
Using a Q-Tip as an applicator, use the clear coat first on your art and remove all the excess. Leave to dry for two hours.

View attachment 34376
Liberally apply the dark coat. Don't be bashful about the amount.

View attachment 34377
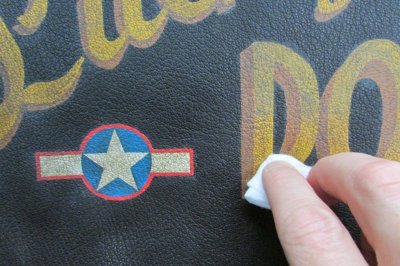
Then remove the excess with a soft cloth.

View attachment 34372
So again, for the back panel, use the clear coat first - and wipe away any excess - and just wait two hours.

View attachment 34378
Then apply the dark coat.

View attachment 34379
Spread evenly with your Q-Tip.

View attachment 34374
And then remove the excess with your soft cloth.

View attachment 34381
Add extra coats of the dark wax until you have the effect you desire.

View attachment 34380 [ View attachment 34384
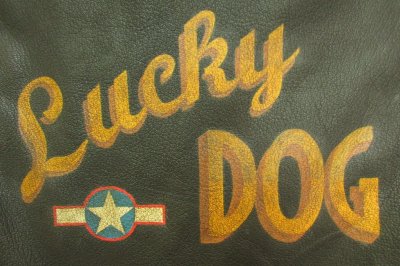
And then, Lucky Dog looked just right to me.

View attachment 34383 View attachment 34382

So there it is! All done. :)
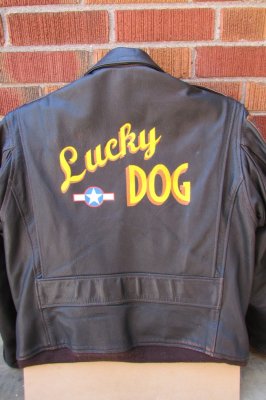
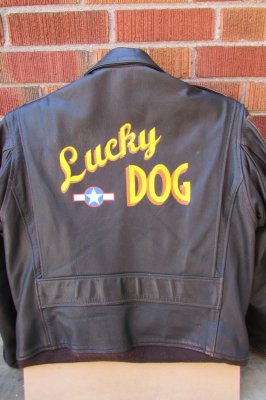
But I know that many folk around here all ask for "fit pics" - and I wanted to show the finished art outside under natural light (the most true and unforgiving) - so they're up in the conclusion.

End of Part 9.
 

Attachments

  • LuckyDogWeathering16.JPG
    LuckyDogWeathering16.JPG
    249.9 KB · Views: 1,287
  • LuckyDogWeathering14.JPG
    LuckyDogWeathering14.JPG
    168.8 KB · Views: 1,314
  • LuckyDogWeathering17.JPG
    LuckyDogWeathering17.JPG
    249.4 KB · Views: 1,281
  • LuckyDogWeathering18.JPG
    LuckyDogWeathering18.JPG
    216.7 KB · Views: 1,299
  • LuckyDogWeathering19.JPG
    LuckyDogWeathering19.JPG
    233.6 KB · Views: 1,277
  • LuckyDogWeathering20.JPG
    LuckyDogWeathering20.JPG
    224.3 KB · Views: 1,291
  • LuckyDogWeathering21.JPG
    LuckyDogWeathering21.JPG
    249.8 KB · Views: 1,288
  • LuckyDogWeathering22.JPG
    LuckyDogWeathering22.JPG
    231.7 KB · Views: 1,313
  • LuckyDogWeathering23.JPG
    LuckyDogWeathering23.JPG
    285.1 KB · Views: 1,243
  • LuckyDogWeathering24.JPG
    LuckyDogWeathering24.JPG
    243.3 KB · Views: 4,079
  • LuckyDogWeathering25.JPG
    LuckyDogWeathering25.JPG
    153.3 KB · Views: 4,039
  • LuckyDogWeathering26.JPG
    LuckyDogWeathering26.JPG
    148.7 KB · Views: 4,027
  • LuckyDogWeathering27.JPG
    LuckyDogWeathering27.JPG
    153.6 KB · Views: 4,037
  • LuckyDogWeathering15.JPG
    LuckyDogWeathering15.JPG
    250.6 KB · Views: 4,017

Stand By

One Too Many
Messages
1,741
Location
Canada
And so, we have arrived at the end and I have taken you from the first draft to the finished piece.

View attachment 34363
View attachment 34362

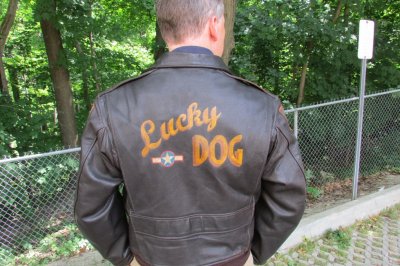
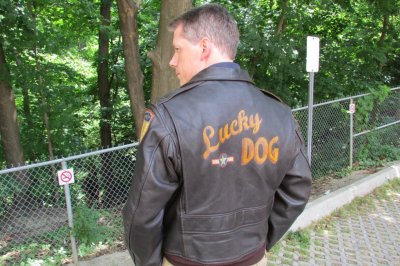
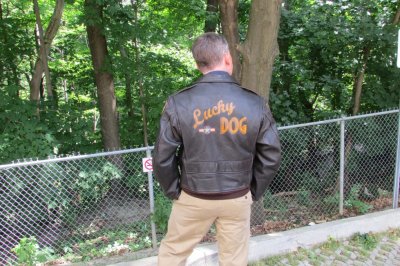
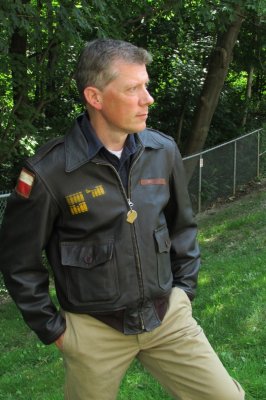
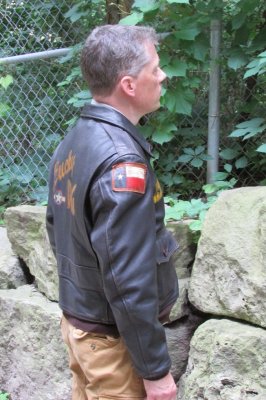
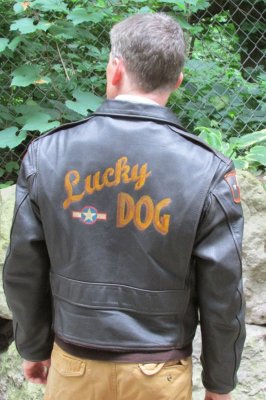
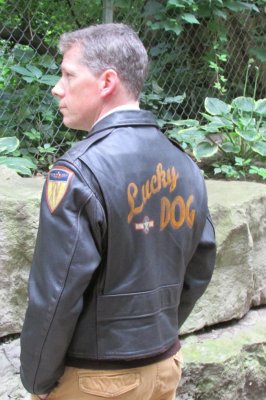
And here are some “fit pics” of the finished work on my Aero ANJ-3, with photos taken outside.

View attachment 34357
View attachment 34356 View attachment 34354 View attachment 34355
View attachment 34358 View attachment 34361 View attachment 34360 View attachment 34359

And that’s all there is to it. All done!

And if you wanted to do a pin-up, it’s all the same procedures – making a template with an outline, details of clothing, anatomical features, shadows, highlights, clothing, folds of clothing, laces and buttons etc. It’s just more, that’s all.

So that’s the basis of how it’s all done and you can do the rest. Trust me, I completed Stand By without ever having seen a single demonstration and with just a rough half-hour guide given over-the-counter from the helpful ladies at Hibbert Bros. and now you know all they told me - PLUS all my own experiences – with photos!
And before you know it, you may well be feeling the itch to do another project and be looking in your reference books again and feeling inspired to try your hand again ... but be warned: you may well need to buy another jacket just so you can do the work!!! Oh dear.

I hope this has helped to shed some light on how to make your jacket extra unique in the world and personalized to you and hopefully you feel less afraid to attempt some jacket art of your own.

As a final note, I would like to point out that I am a professional Anaplastologist i.e. a medical artist who specializes in making head and neck facial prosthetics and my interest in WW2 nose/jacket art is just that; a hobby that I do for my own enjoyment and fulfilment. There are other professional artists out there (and around here) who do this for a living and, like all things in the artistic world, there are many other ways to achieve the same or similar results and other artists will have different opinions on what works better or best for them. My way is by no means the only or proper way (I read online how one jacket artist sarcastically scoffed at the mere idea of using a stencil – but then he never offered up his own tips or an alternative) - it is just one way that was told to me and I can say that it works - and can work for you too.

All the best and good luck - and really have fun with it!

Stand By
 

Attachments

  • LuckyDogFinished#2.JPG
    LuckyDogFinished#2.JPG
    309.9 KB · Views: 4,083
  • LuckyDogFinished#3.JPG
    LuckyDogFinished#3.JPG
    316.6 KB · Views: 4,111
  • LuckyDogFinished#4.JPG
    LuckyDogFinished#4.JPG
    349.1 KB · Views: 4,139
  • LuckyDogFinished#5.JPG
    LuckyDogFinished#5.JPG
    237.7 KB · Views: 4,113
  • LuckyDogFinished#6.JPG
    LuckyDogFinished#6.JPG
    251.8 KB · Views: 4,105
  • LuckyDogFinished#7.JPG
    LuckyDogFinished#7.JPG
    244.1 KB · Views: 4,086
  • LuckyDogFinished#8.JPG
    LuckyDogFinished#8.JPG
    227.8 KB · Views: 4,165
  • LuckyDogFinished#9.JPG
    LuckyDogFinished#9.JPG
    218.8 KB · Views: 4,136
  • LuckyDogFinished#10.JPG
    LuckyDogFinished#10.JPG
    251.1 KB · Views: 4,126
  • LuckyDogFinished#11.JPG
    LuckyDogFinished#11.JPG
    191.9 KB · Views: 4,221
Status
Not open for further replies.

Forum statistics

Threads
109,306
Messages
3,078,477
Members
54,244
Latest member
seeldoger47
Top