Want to buy or sell something? Check the classifieds
  • The Fedora Lounge is supported in part by commission earning affiliate links sitewide. Please support us by using them. You may learn more here.

Martvjp

New in Town
Messages
23
I like the Millinery Whse felts. There are only two suppliers available these days for beaver felts for the small hat maker. Mill Whse and PureBeaver (for FEPSA). I stock both and both have their niche depending on what type hat you are making....choose what type hat you are making, then chose the felt that fits that the best.
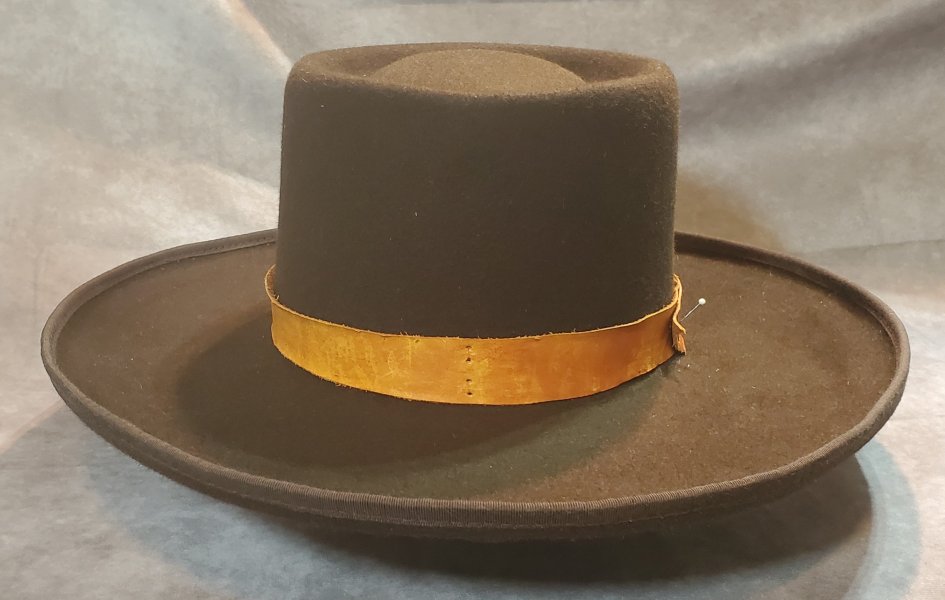
Yes that's what I was thinking as well. Good to know for Milinery Warehouse, thanks a lot :)
 

Martvjp

New in Town
Messages
23
Dear Friends,

I want to express my gratitude for all your advice and kindness in sharing your knowledge. A special thanks to Robert, who always responded quickly and with great insights! I’m excited to share that I’ve completed my first hat. I used a 100% Rabbit Fepsa felt, 170g, in brown. However, I faced a few challenges along the way:

  • When the felt is on the hat block, everything looks fine, but as soon as I place it on the table, a thin gap appears between the hat block and the felt. I tried several times but encountered the same issue.
  • Sewing the sweatband has been particularly challenging, especially since I’ve never sewn before. However, I’m happy to say that my second attempt on my next hat is already much better.
  • Shaping the hat proved to be difficult, and I know it will take multiple attempts before I get it just right.
I welcome any feedback, including constructive criticism, as I know there’s plenty of room for improvement.

I’ve attached some pictures of the hat on the link (I tried on the forum directly but it's not working), which features a leather hatband made by a skilled craftsman from the USA : https://postimg.cc/gallery/LmYTY89

Next up, I’ll be making a 100% Rabbit Fepsa felt hat, 230g, in dark purple for my girlfriend. After that, I’ll tackle a fedora.

Thanks again, and I look forward to hearing your thoughts!

https://postimg.cc/CnVL9Qj3] [/url]

https://postimg.cc/dDKybHtQ] [/url]

https://postimg.cc/3kW4Xz91] [/url]

https://postimg.cc/bsmS2q0d] [/url]

https://postimg.cc/phMmtrvc] [/url]
 
Messages
10,741
Location
vancouver, canada
Dear Friends,

I want to express my gratitude for all your advice and kindness in sharing your knowledge. A special thanks to Robert, who always responded quickly and with great insights! I’m excited to share that I’ve completed my first hat. I used a 100% Rabbit Fepsa felt, 170g, in brown. However, I faced a few challenges along the way:

  • When the felt is on the hat block, everything looks fine, but as soon as I place it on the table, a thin gap appears between the hat block and the felt. I tried several times but encountered the same issue.
  • Sewing the sweatband has been particularly challenging, especially since I’ve never sewn before. However, I’m happy to say that my second attempt on my next hat is already much better.
  • Shaping the hat proved to be difficult, and I know it will take multiple attempts before I get it just right.
I welcome any feedback, including constructive criticism, as I know there’s plenty of room for improvement.

I’ve attached some pictures of the hat on the link (I tried on the forum directly but it's not working), which features a leather hatband made by a skilled craftsman from the USA : https://postimg.cc/gallery/LmYTY89

Next up, I’ll be making a 100% Rabbit Fepsa felt hat, 230g, in dark purple for my girlfriend. After that, I’ll tackle a fedora.

Thanks again, and I look forward to hearing your thoughts!

https://postimg.cc/CnVL9Qj3] [/url]

https://postimg.cc/dDKybHtQ] [/url]

https://postimg.cc/3kW4Xz91] [/url]

https://postimg.cc/bsmS2q0d] [/url]

https://postimg.cc/phMmtrvc] [/url]
A very good beginning indeed! Always keep in mind there is no destination, only process. With each hat (approaching 500) I get a little better, I aim to improve in some small way. That is my goal: to produce good hats and get better with every hat. I prefer to lightly SAND the hard edge of the brim (400 grit) to knock off the corners. A piece of sandpaper between the fingers and sand the full 360degrees softening and thinning the edges. Your two best tool investments are a good source of steam (Jiffy Steamer J1) and a good steam iron.
 
Last edited:
Messages
10,741
Location
vancouver, canada
Here is my latest toy: an 18", solid marble Lazy Susan I picked up on FaceBook Marketplace for $30. Not a huge upgrade but as I pounce all by hand it helps the process as I get to sit and it is easy to rotate the felt. Most common are the 12" ones so not large enough. When I saw this 18", I had to jump.
turntable2.jpg
turntable1.jpg
 

ILB Frank

One of the Regulars
Messages
186
Here is my latest toy: an 18", solid marble Lazy Susan I picked up on FaceBook Marketplace for $30. Not a huge upgrade but as I pounce all by hand it helps the process as I get to sit and it is easy to rotate the felt. Most common are the 12" ones so not large enough. When I saw this 18", I had to jump. View attachment 635921 View attachment 635922
Hmmmm... Might be my wishful imagination but that looks like a black nutria felt in western weight;)
 

Darrell2688

A-List Customer
Messages
367
Location
Piner, Kentucky
Hello Fedora Fans,

I am working on a hat right now that I will be putting a brim binding on, my first time using good proper ribbon and I will be sewing it onto the brim using a sewing machine, another new operation, I normally hand sew everything. The brim will also get a 1/2" pencil curl, needless to say this will be a challenge for me

My question is, should I do the pencil curl first or after I sew the binding in place?

Thank you for your time and help,
Darrell
 

T Jones

I'll Lock Up
Messages
6,757
Location
Central Ohio
Hello Fedora Fans,

I am working on a hat right now that I will be putting a brim binding on, my first time using good proper ribbon and I will be sewing it onto the brim using a sewing machine, another new operation, I normally hand sew everything. The brim will also get a 1/2" pencil curl, needless to say this will be a challenge for me

My question is, should I do the pencil curl first or after I sew the binding in place?

Thank you for your time and help,
Darrell
Pencil curl first.
 
  • Like
Reactions: RBH

Darrell2688

A-List Customer
Messages
367
Location
Piner, Kentucky
Pencil curl first.
Thank you Sir, By the time that I took time to read your response I had made and then used a sewing machine to sew the binding in place. The next time that I do a brim binding I will do the brim curl and then the binding, that should be interesting. How hard is it to sew a brim binding into place on a brim that has been curled? I posted photos of the hat that I put the binding on in Busted Hats, the 1/2" brim curl looks more like a 3/8" curl because of the binding.
 

Attachments

  • 20240830_212230.jpg
    20240830_212230.jpg
    554.3 KB · Views: 17

shopkin

Familiar Face
Messages
83
Curling maintains or decreases the edge circumference. Curling is a process of compressing the fiber and preventing the circumference from increasing. It's the same with a snap brim. When hand sewing, extra tension can be applied to every stitch to compress the fiber and reinforce the curl or snap brim. A machine has feed dogs and a pressure foot specifically designed to prevent that from happening. Adjust the machine accordingly.
 

T Jones

I'll Lock Up
Messages
6,757
Location
Central Ohio
Thank you Sir, By the time that I took time to read your response I had made and then used a sewing machine to sew the binding in place. The next time that I do a brim binding I will do the brim curl and then the binding, that should be interesting. How hard is it to sew a brim binding into place on a brim that has been curled? I posted photos of the hat that I put the binding on in Busted Hats, the 1/2" brim curl looks more like a 3/8" curl because of the binding.
You're welcome buddy. As far as the difficulty level in sewing the binding to a curled brim, it's fairly easy. It's more time consuming than anything else. Especially if you're sewing by hand. The only difficulty I find when hand sewing is that my back gives out if I'm sitting too long.
 
Messages
10,741
Location
vancouver, canada
Is it possible to show me how it should look like if I sew the brim by hand as well please ?
I suggest you sew the brim first, struggle through it and then post your results. Then we can give you feedback on your work. I for one would never attempt to sew a brim binding by hand. I don't have that level of patience. Even sewing by machine it takes upwards of 90 minutes. Hand sewing perhaps double that. Will your customers be willing to pay that much of an upcharge for that amount of labour?
 

Darrell2688

A-List Customer
Messages
367
Location
Piner, Kentucky
I did sew the brim binding into place with a flat brim and then I made the brim curl. The one problem that I noticed is the ribbon shrinks, it doesn't shrink enough to hold the brim in a 1/2" pencil curl. What would be the results if you cut the ribbon 1/2" short, sew the ribbon ends together and then put it onto the flat brim, the tension of the ribbon would cause the brim to curl some, and if you sew it into place by hand, a saddle stitch would be best, use 2 needles, 1 on each end of the thread, each needle passing through the same hole as you stitch your way around the brim, then spray the brim edge with water and as it dries the ribbon should shrink up some pulling the brim into a curl. I am not sure if the customer would be willing to pay for the extra labor, I guess that would depend on the end results and I am interested in learning the binding process plus making a bound edge into a pencil curl shape.
Has anyone tried the idea of cutting the ribbon a little short then attaching it to the brim?

When I started the process of making a brim binding, I used small fabric clips to hold the ribbon in place as I worked my way around the brim, then I used a stick pin through the 2 ends to hold the loop, I removed the ribbon and stitched the 2 ends together by hand, cut the excess ribbon off 1/2" away from the seam and then cut the corners off of the two ends, then put the ribbon over the brim edge, it fit like a glove.
 
Last edited:

Forum statistics

Threads
108,385
Messages
3,060,271
Members
53,618
Latest member
bigdog42
Top