Want to buy or sell something? Check the classifieds
  • The Fedora Lounge is supported in part by commission earning affiliate links sitewide. Please support us by using them. You may learn more here.

Hat band replacement step by step

Fortino37

Familiar Face
Messages
76
Location
Mexicali
One way Bow

bolthead said:
Do you have any tips on how to apply a one way Bow Treatment?
I would love to learn to make one, then swap it out onto another hat of mine. :D

I am sorry but what do you mean with "to apply a one way Bow Treatment"? English is not my mother lenguage.

Fortino
 

bolthead

My Mail is Forwarded Here
Messages
3,905
Location
Pennsylvania, United States
Picture....

I'll look for a picture, in the mean time.....if anyone else knows what I'm talking about and might even have a hat with this type of ribbon/bow, maybe they can post a pic for me. Thanks in advance.
 

Stoney

Practically Family
Messages
977
Location
Currently on the East Coast
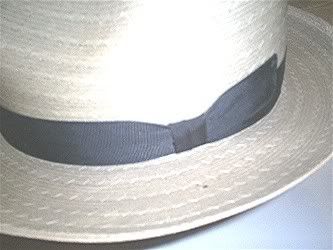
Is this the type of Bow Bolthead?

I'm thinking that this may be an example of the one way bow you were referring to. The ribbon is one solid piece the wraps around from the back of the hat, across the front then through the knot and finally to the back again where a single bow end is fashioned. It's a pretty neat ribbon treatment and I like the way it looks on this inexpensive straw hat.

LoopedBow.jpg
 

MrFusion

One of the Regulars
Messages
258
Location
Columbia, Maryland
Is this the same method one would use to put a ribbon and bow on a panama? I was thinking of trying my hand at this with one of the new panamas I just got from PanamaBob.
The reason I ask is that I have seen a thread with a band that could be swapped for another that was a different color so I wasn't sure if sewing a ribbon on a panama was the standard procedure.
 

bolthead

My Mail is Forwarded Here
Messages
3,905
Location
Pennsylvania, United States
Stoney.....

Stoney said:
I'm thinking that this may be an example of the one way bow you were referring to. The ribbon is one solid piece the wraps around from the back of the hat, across the front then through the knot and finally to the back again where a single bow end is fashioned. It's a pretty neat ribbon treatment and I like the way it looks on this inexpensive straw hat.

LoopedBow.jpg
Yes, that's exactly what I'm talking about. Does anyone know how to tie this Ribbon Treatment?
Also, what era does it come from?

Thanks Bruce. ;)
 

dawgvet

Familiar Face
Messages
95
Location
Waleska, Ga
I am thinking about trying out a wider ribbon on one of my Akubra Camp Drafts and was wondering how hard it would be to make your own. Not thinking of anything fancy, just a single bow. Could I just go to a fabric store and pick out some ribbon? My main question would be how is it folded and sewn? Any tips, pics, YouTube, etc appreciated.
Thanks
Jedidiah
 

Hereward

One of the Regulars
Messages
246
Location
London, England
I recently put a 2" ribbon on a hat. Patience and carefully following the instructions on the other thread previously linked to, will lead to success. The problem is getting good ribbon. Mine had to come from the US because I couldn't find it here in the UK.
 

BanjoMerlin

A-List Customer
Messages
477
Location
New Hampshire, USA
Ribbons really aren't that hard to do once you get the hang of it. Most fabric stores have grosgrain ribbon made of 100% polyester - not something you want to put on your hat but cheap enough for learning. The big problem with the polyester stuff is it tends to melt when you iron it.

You'll want to find some cotton/rayon grosgrain ribbon to actually put on your hat (unless you are lucky enough to find silk).
 

Not-Bogart13

Call Me a Cab
Messages
2,501
Location
NE Pennsylvania
Yeah, I hear the higher the rayon content, the better. The problem with the poly stuff is, it won't shrink to conform to the hat with steam or water. :mad:

I used the link to the Dalexs instructions as a foundation for trying it. It took patience and a few finger pokes, but I my first effort came out pretty nicely. That hardest part is matching the thread for minimal visibility.
 

BanjoMerlin

A-List Customer
Messages
477
Location
New Hampshire, USA
Not-Bogart13 said:
It took patience and a few finger pokes, but I my first effort came out pretty nicely. That hardest part is matching the thread for minimal visibility.


Oh yeah, I forgot an important thing.

Do your first few with a hat and ribbon color that won't show blood!
 

EggHead

Practically Family
Messages
858
Location
San Francisco, CA
Thinking of changing ribbon

I decided to look at that link to see if I could change the ribbon myself. (I don't like charcoal ribbon on a charcoal Sydney hat - I think a little contrast would go a long way. A peeve - don't these hat designers see that!!) I want to replace it with a lighter gray color. In any case, I read the instructions and thought that they were incomplete. Seems that it was about making a bow, there were no tips on how to wrap/measure the ribbon around the bottom of the hat, what to lookout for, how to stitch the ribbon ends so that it wouldn't come apart, how to deal with the inner lining of the hat, what type of threads to use, a list of common and specialized tools to use.

I know these may sound trivial to experienced, but the only thing I've done was to sow a button on a shirt a couple of times.:D
 
Messages
10,950
Location
My mother's basement
EggHead said:
I decided to look at that link to see if I could change the ribbon myself. (I don't like charcoal ribbon on a charcoal Sydney hat - I think a little contrast would go a long way. A peeve - don't these hat designers see that!!) I want to replace it with a lighter gray color. In any case, I read the instructions and thought that they were incomplete. Seems that it was about making a bow, there were no tips on how to wrap/measure the ribbon around the bottom of the hat, what to lookout for, how to stitch the ribbon ends so that it wouldn't come apart, how to deal with the inner lining of the hat, what type of threads to use, a list of common and specialized tools to use.

I know these may sound trivial to experienced, but the only thing I've done was to sow a button on a shirt a couple of times.:D

That's all cool, Egghead. Sometimes we forget that people aren't born knowing how to do these things. (Watching me attempt home-improvement projects is usually good for laughs.)

Often, there's more than one way to do things. Some of those ways are better than others, probably, but any method that produces good results is good enough, right?

How you'll go about replacing a hat band and bow will depend to a large degree on the style of band and bow. Taking apart a few hats might be the best way to learn how hats are put together. But, carefully examining hats ought to be enlightening. Turn sweatbands out and peek under linings.

If you make a mess of it, well, know that even experienced people mess up occasionally. So you just do it again.
 

Undertow

My Mail is Forwarded Here
Messages
3,126
Location
Des Moines, IA, US
I've been experimenting with this, and it's already been alot of fun. I like some of these links provided, they help tremendously on some simple, yet important points that I've been struggling with. On the other hand I'm trying a few different approaches to the bow (I'll be posting pictures when the job is done, but up to then, I'll just describe my actions and see what you guys think).

Rather than replacing the ribbon, I'm keeping the original, washing it and tacking it back up. However, I've taken apart Stetson's lame, flat, stapled bow and replacing it with a stitched double-bow. I plan to stitch the new bow to the existing ribbon (which will avoid a few key stitches, I'll explain in a moment).

First, rather than folding the ribbon in half from end to end, I bring the two ends to meet in the middle and stitch them together in back, leaving a soft rounded edge on each end. This first bow is a contrasting color (we'll use cream) and is about 4cm longer than the original Stetson bow.

Second, I repeat the above steps for the second bow bringing the ends together and sewing end-to-end in the middle, leaving soft, rounded edge on each side. This bow is only 1-2cm larger than the orginal Stetson bow, just enough to hide it. It's black grosgrain and matches the original ribbon.

I stitch the 2nd bow to the 1st (smaller on to larger), stitching up the middle to connect the two. I use the "V" pinch to pinch the bow in the middle. Then I take the round middle part, slide it over one end and stitch to connect. This leaves me with an entire bow separate from the original ribbon.

Now all I have to do is tack stitch the bow over the original spot. Because the original ribbon is already tacked to the crown, I can stitch closer to the center of the bow which allows the rounded, soft edges to rise slightly from the hat giving the appearance of a genuine bow.

Does that make sense? I'm halfway through this, just need to slide the round center piece over and then tack bow to ribbon. I'll post pictures soon.

btw, I plan to place this bow on the BACK of the hat, rather than the standard side-bow. ;)
 

Undertow

My Mail is Forwarded Here
Messages
3,126
Location
Des Moines, IA, US
Alright, ran into a snag (haha, okay, no more puns).

Wal-Mart, Hancock Fabrics, Hobby Lobby and Michaels (no idea if those are national) all carry polyester ribbon, which, as has been mentioned before, is NOT sufficient.

Anyone have a good source for Cotton/Rayon grosgrain ribbon? Either online, or a national source?
 

Forum statistics

Threads
109,666
Messages
3,086,148
Members
54,480
Latest member
PISoftware
Top