Want to buy or sell something? Check the classifieds
  • The Fedora Lounge is supported in part by commission earning affiliate links sitewide. Please support us by using them. You may learn more here.

Achieving that vintage look, via PhotoShop

priestyboy

One of the Regulars
Messages
132
Location
Olympia, WA
Vintage Look Photos -- How to get the look?

I've seen a few of you out there take/make some photos that had the vintage look to them.

Paddy has a few in his Hall of Honor page with guys in their AAF uniforms with an appropriate background and all the right touches to make it look as if they were actually taken in 1943.

How do you do it? Photoshop? Actually use a Brownie camera? Help!!:eusa_doh:

This is something I want to do but don't really know where to start.

Any advice?
 

Miss Lucy June

One of the Regulars
Messages
194
Location
South Carolina
I know someone posted that you should up the contrast, and I agree for that artsy look, but I will say that with most normal photographs the contrast is knocked down. You can take any image, convert it to grayscale (or use another way to take the photograph to grayscale), then edit the contrast and lightness. Sometimes I like to add noise to it as well as a lot of old photographs weren't crystal clear.
 

Sweet Polly Purebred

A-List Customer
Messages
341
Location
Savoir Faire, North
I do a lot of photo restoration and digital colourization, and I think some of the techniques can be used in reverse to create a vintage colourized look.

This is for Photoshop CS2 -

Say you want to take a colour photograph and send back in time ..

First take your photograph then go to image>mode> and select greyscale.

Depending on whether it's to be used for print or the web go back to image>mode>and convert to the appropriate profile. RGB is web, CMYK is print. The photo will still be greyscale, but you've now made it capable of taking the colour that you are about to add.

Adjust the levels enough to slightly bring up the contrast to simulate an analog (film) photograph.

The next few steps are tricky, but it results in the most authentic 'vintage' style colourization. It's all a matter of taste, so don't be shy about playing and experimenting. Some really interesting things happen purely on accident!

In the layers pal. create a new adjustment layer above the original image by selecting "Solid Color" layer. Say for the first layer it will be the cheeks. In the dropper/colour chooser, select a colour closest to the tone you like. It'll create a full screen of colour, but don't panic .. Go to image>adjustments>invert. You now have an invisible layer of colour. Select the brush tool and set the opacity to about 20%. Paint over the area that you want that colour to appear. You can modify the opacity in the layers pal if you want it lighter or deeper. I like to add a Gaussian blur to my layers to keep them soft, but that's up to you.

Essentially follow those steps for each item to be coloured. Lips, eyes, hair, flowers, shoes, etc.
 

sbd234

New in Town
Messages
4
Location
Fayetteville, Georgia
Vintage Look

Jeff,
Photshop seems to be the best, unless you like spending time in the darkroom.
Where have you been? We thought you went MIA.
Call the hanger sometime.

Charles
CAF Dixie Wing
 

DeeDub

One of the Regulars
Messages
223
Location
Eugene, OR
Alternative Ways of Converting to B/W

Everyone's mentioned using Image > Mode > Grayscale to convert to black & white in Photoshop. This is how I've always done it, as well.

It turns out there are a couple of other ways that may give you better results, depending on your desired result. I attended a NAPP-sponsored Photoshop seminar with Bert Monroy in South San Francisco last month. He talked about using Image > Calculations to preserve the color channels that best represent the image.

Bert has some great tutorials on his website http://www.bertmonroy.com/ but I didn't see one on this topic specifically. However, I did find a discussion of this technique, as well as another technique using Image > Adjustments > Channel Mixer, at http://www.kenrockwell.com/tech/photoshop/b-w.htm.

The NAPP Photoshop and Illustrator seminars are still on the road. If you're interested, see http://www.photoshopseminars.com/
 

MrPumpernickel

One of the Regulars
Messages
111
Location
Sweden
There are many different methods that I have used, and do use, to achieve vintage looks, I'll try to explain a few of them briefly.

If we're talking only Photoshop with no external plugins there are a few routes to take. First you have to decide whether you're going to go the color or black and white (or sepia) route. I'm not much for creating color vintage photographs so let's decide on black and white for now. The first thing I do is to make sure I have a good grayscale image to work from and I never ever use the desaturate or convert to grayscale commands to make the image grayscale as they are both lacking. Like mentioned in the previous post go instead to Image > Adjustments > Channel Mixer, tick in the "Monochrome" checkbox and start dragging sliders until you have something which you're satisfied with. I could go on at length about why the Channel Mixer is superior to other methods but suffice to say that it's capable of creating anything from highly contrasted grayscale images to images lacking most contrast whatsoever, it's also able to pick out detail that may only be avaliable in one color and so forth.

Once you have done this and you want to work further towards sepia or other tints you can either start working with new layers on top of the layer you've been working with and use various colors and blending modes to simulate various styles and feelings to the images. You can also of course use the "Colorize" option of the Hue/Saturation tool (Image > Adjustments > Hue/Saturation), though the results of that leave quite a bit to be desired.

Another standard Photoshop tool which I won't go into detail about but can definitely recommend alongside the Channel Mixer is the Color Balance (Image > Adjustments > Color Balance). It will allow you to edit colors based on light intensity (i.e. Shadows/Midtones/Highlights) which can help a lot when used correctly and trying to achieve a vintage look.

If we backtrack a bit I can tell you a method which I used to great extent in the past and that's working with duotones. After you've done your deal with the Channel Mixer then convert your image to grayscale (Image > Mode > Grayscale) and then convert it again to Duotone (Image > Mode > Duotone). You have quite a few presets which come with Photoshop which you can play around with and you can also create your own. What's so good with duotones is that you can map different colors to different intensities of gray in your grayscale image. Working with a few different shades of brown and beige and adjusting the curves a bit can create great results. You can read a bit more about duotones here.

Though, for my favourite, and personally most rewarding way to getting the vintage feel in my photographs there is a plugin which I can highly recommend Alien Skin Exposure. It has powerful tools for converting both color and black and white images to a wide variety of different styles, anything from a daguerreotype to a contemporary photograph. It has settings for blurring, sharpening and an absolutely awesome grain generator which creates actual believable film grain and not the poor standard grain that Photoshop can offer. You can adjust channels independently of each other, distribute grain differently depending on light intensity and so forth. It's a full flexed package with almost everything you need for color conversions.

I say almost because as most of you realize there's quite a bit more to creating a vintage photograph than just color and grain. I find for instance faking depth of field in images so that the background is more blurred than it was when shot with the camera I have helps quite a bit to sell the old feel of the image as well. This can rather easily be done by making a mask, masking the background and in Photoshop (from CS and up) go to Filter > Blur > Lens Blur in which you can simulate lens blur on parts of your image. It is somewhat lacking so there are other ways of doing this as well, although like most of the times the really good results come from using a third party plugin. In this case I can definitely recommend Depth of Field PRO partly because of the control that it offers and partly because of the great results.

Another thing is vignetting, an important and often overlooked part, especially in creating older photographs. Having the image turn progressivly darker around the edges is a great help in getting that old feel. Other things that can help is to edit in creases, or even tearing, into the images. In other words, imperfections that collected over the years, or even imperfections in the film or camera itself by adding overexposed blotches or dirt to the photo. I also enjoy making custom frames to the pictures (still in Photoshop) to make it look like it was developed onto old paper that too has yellowed over the years. For instance like this.

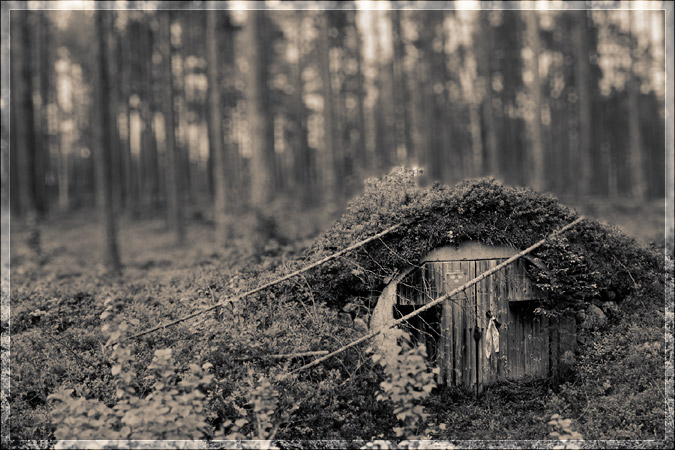
While the following isn't entirely a "vintage" picture this shows some of what combining methods described above is capable of:

This is the original picture without any real editing:

20060612greenery.jpg


And this is the edited image, colors changed with Alien Skin Exposure, depth changed with Lens Blur (or DofPRO, can't remember):

sepiaforest.jpg


If you have any questions then by all means ask, I didn't make the instructions as extensive as I could so it does require some previous knowledge of Photoshop at least.
 

MrPumpernickel

One of the Regulars
Messages
111
Location
Sweden
Pink Dahlia, that's a rather good start, but I have some pointers for you (and for anyone reading really). Firstly, creating a vintage look is more than just doing a few all over alterations to a picture since there are plenty of things that can break the idea that the photo was taken quite some time ago.

Firstly there's grain, there's quite a difference between the three various kinds of grain: film negative grain, digital camera grain and digitally made grain (i.e. with Photoshop or similar). The problem with the latter is that it takes no real care to where to put the grain in a believable manner, it just treats the whole image the same. This is bad mainly because real film and camera grain accumulates in the midtones and shadows (and rather little in the highlights). There are ways around this though, you could make a copy of your picture layer, apply the grain onto that and then with a soft and rather transparent brush mask off the areas where you don't want the grain to be as apparent. Computer generated (or should I say Photoshop generated) grain are also often the wrong size and far too uniformly placed. Once again I can only recommend Alien Skin Exposure which I recommended earlier, it has controls to place grain selectivly in various light intensities and at various sizes. It's by far the best emulator of film grain that I've found.

When it comes to film grain versus digital camera grain I won't go too much into detail other than to say that film grain is created in the film negative (and print) through chemical processes whereas the digital grain is created on the image sensor in the camera. Which means that they look different and thusly also means that oftentimes, to a trained eye, the two types of grain are recognizeable from each other.

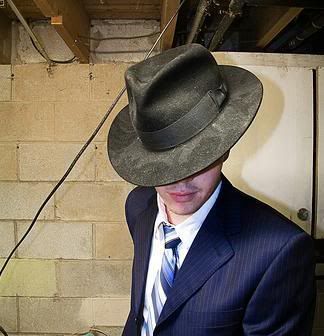
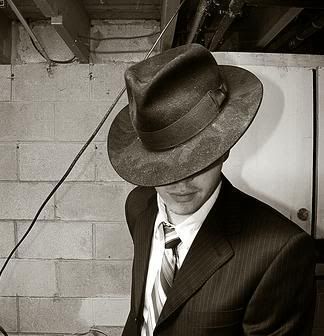
Another thing to achieving a vintage look is to not have any contemporary objects in the photograph. The first two images work fairly good when it comes to that aspect but the last one is broken because of the clothes iron in plastic.

It's a really good start, do by all means keep working on it, and when you think you're done take a break, walk away and focus your eyes on something else. Come back and look at it again to find what you may have missed and what can be done better and more believable.

Another thing which I'd like to touch is dirt, though this definitely depends on what direction you're going with your photo. If you're going for photos with an archival quality you'll definitely want to skip this part, but if you, like me, like pictures that look somewhat like they've been stored in a trunk in a dusty attic for decades then you might want to read on. Adding dust and scratches can quite easily be done by taking a blank sheet of paper and littering it with small specs of dust, maybe a hair and so forth to whatever degree you find adequate. Then take a picture of the paper and put that picture on a separate layer over the image you're vintaging up. Mess around with layer blending modes and so forth until you're happy with what it does with the image. Another thing closely related to this is creating stains, perhaps your photo has at some point in its life been wet which has caused stains to form on the photo. Similarly this can also be done by staining a piece of paper with for instance coffee and taking pictures of it once it's dried.

Here's a picture which I knocked out yesterday (posted it in the 'What do you look like' thread) which encompasses some of the things I speak about as well as some other things like framing, scratches and deteriorating of the edges of the photo:

<img src="http://mousevomit.com/blog/selfo/20070507whatoncewaswillneverbeagain.jpg">
 

Miss Lucy June

One of the Regulars
Messages
194
Location
South Carolina
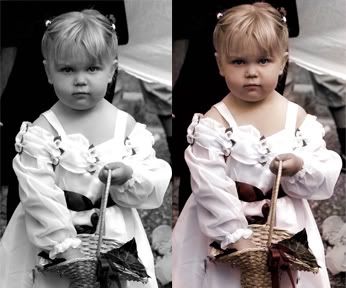
This is something else y'all might want to try. Later I'll post pictures of me that I've technicolored, if you want to see, but as for now here's a picture of a lovely flower girl that I got in color first, changed it to grayscale by changing it to lab and deleting the a and b layers (you can convert to grayscale in multiple ways), and then used multiple masks and layers to change it to technicolor. It looks like this, and I'll link a good tutorial for you. Enjoy!

technicolor.jpg


http://www.worth1000.com/tutorial.asp?sid=161015
 

Rafter

Suspended
Messages
436
Location
CT
A program at "meez" enables you to achieve a different kind of vintage self-portrait.
Here is my "vintage-meez"!

mz_0703_10008355116.gif
Here is my vintage meez!
 

MrPumpernickel

One of the Regulars
Messages
111
Location
Sweden
A small addition to what I've said before, there is no better way to vintage up a photograph (if you want it all creased and damaged that is) than to look at real sources and either emulating or taking bits and pieces from them to use in your own works. I just noticed a thread here on The Fedora Lounge with songbook covers which are absolutely beautifully worn over the years. Great to take inspiration from I'd say, check them out yourselves: http://thefedoralounge.com/showthread.php?t=17801
 

Forum statistics

Threads
109,640
Messages
3,085,519
Members
54,470
Latest member
rakib
Top