So ...Painting (and, as I'm limited to 10,000 words per thread, this is in two parts to illustrate what I'm on about).
In WW2, the nose and jacket art works were done with whatever paint was to hand on the base. This was usually enamel or similar oil-based paint and in limited supply and so there wasn't a lot of range of colours. And not every base had a competent artist - the job sometimes just fell to whoever showed even a glimmer of talent, and so the quality of works varied enormously from the rough and basic through to the truly amazing and artful.
The ladies at Hibbert Bros. told me that I could use artist acrylics and/or artist oils. Now, back then, this was all new to me. I was a seasoned aircraft model builder, having made models all my life since I was 6, but had only ever used enamels (hand-brushed and airbrushed) - so I felt really quite daunted by this.
"Don't worry. You can do this", they said. And you can too.
Artist acrylic paints are easy. They go on smoothly and set very quickly and can be over-painted in minutes. Being water-based, any mistake can be removed quickly with a wet cloth or Q-Tip. Note that acrylic paints are sold in varying degrees of quality; namely student grade and professional grade. Student grades are for students who typically have less money to spend, so the quality of the pigments and fillers is reflected in the lower price. My advice: Get the professional grade as this is a design you only intend on doing once and it should be the best it can possibly be and it's a precious A2 we're talking about here! Invest in the best.
You will first need to paint a white base on the jacket in the shape of your design - to get the colours to stand out and work properly. You could use gesso (in the same manner as artists use it on canvas) as it is white and flexible, but a simple white acrylic base will work just fine and is what I use.
A word on additive mediums:
You will need to add Tension Breaker - this does a couple of things: it lowers the surface tension of the acrylic paint and improves the bond to the fabric and it also helps the paint to flex - so it won't crack as the jacket bends. I used one by Rowney back then. These days, as far as I know, only one company (Matisse Derivan) in Australia still makes it under the name of Surface Tension Breaker and I got mine from Oz online. Windsor & Newton also makes Flow Improver and it too is designed to help the acrylic flow (as the name says!) and help you get a nice, neat "hard edge" with the acrylic paint - and I once called the rep at the factory and told him about my old Tension Breaker and he said it was the same thing and the same formula.
Another medium to consider is Retarder. As I mentioned, acrylic paints set quickly which can be a bonus - but depending on the day and what you are doing, they can set a mite too quickly - especially if you are trying to take your time and blend some nice flesh tones or something similar. Retarder is a medium that slows the drying and allows for some extra working time.
Artist oil paints work very well too but, whereas the acrylics set in minutes, oils can take a week. Yes, a week. This is great if time is not important as they are immensely forgiving and you can easily remove mistakes with a Q-Tip or soft cloth and adjust your work as you go and review/correct it over days. If you need to speed certain colours up, you can add some Japan Drier which halves the drying time to a few days, but do be sure to use this in a well-ventilated area as it's a bit toxic and harmful to the ol' lungs. Oils have equally good permanence too.
If you're doing a pin-up girl and want nice, blended flesh tones with no brush marks, oils would be a good choice. And that’s where oils are useful – they allow you time to work and get nice blends whereas acrylics set too quickly.
Use a tension breaker of course – and in this case, you’d want something like Oil Painting Medium I by Grumbacher.
“How do I choose what paint medium I should use?” I hear you ask.
Well, that depends on what you are wanting to do.
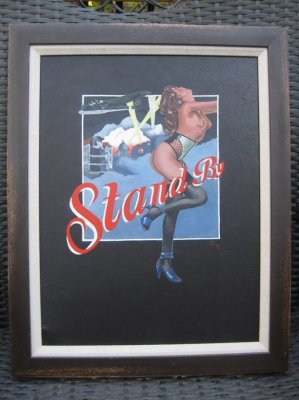
Let’s look at my very first work “Stand By” as an example:
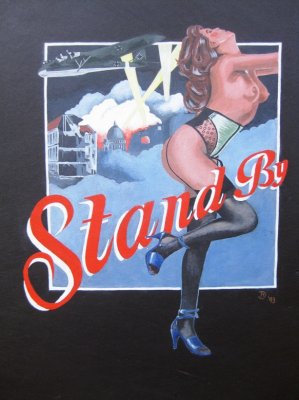
The lettering was done in acrylics and they’re very opaque and go on well, there's no blends of colours required and are ideal for this - but the pin-up girl and smoke was all done in oils.
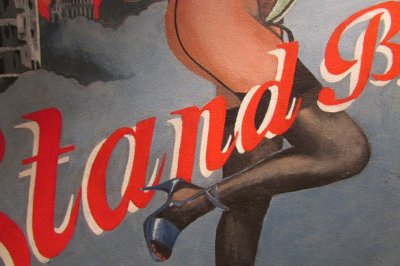
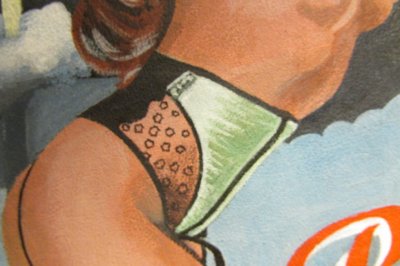
Note the flesh tones of the girl and how they are nicely blended from the highlights down to the shadows. Oil paint allows you lots of time to blend paint nicely and erase any mistakes or brush strokes. Being more translucent, you may need to use a couple of coats of oil paint flesh tones, but that’s okay. Take the time. The result is worth it! Begin by getting a basic flesh tone paint colour and putting that down as a base and letting it dry. Then work the other flesh tones (cool and warm crimson tones, highlights, shadows) on top. Flesh tones are tricky but oils will allow you to practice and develop your skills as you go. There are also kits of flesh tones in hobby stores and they will give you an idea of the colours you should emulate, as well as some good how-to guides in model forums.
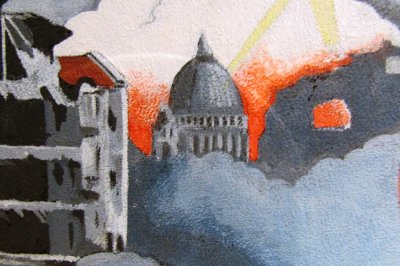
Note also too the smoke – you will notice that it goes from a darker blue-grey at the bottom corner of the work and changes gradually and seamlessly to a lighter blue-grey as it gets higher and the perceived light changes. Again, it’s a seamlessly smooth blend of hue and value which could only be done with oil. Acrylics would set far too quickly on you and make hiding brush strokes very difficult. St. Paul’s cathedral and the bombed out buildings were also done in oils.
The Messerschmitt Me- 323 “Gigant” and spotlights were all done in acrylics. The white cloud is simply the white base coat.
Note that you can paint oil paint on top of acrylic paint but it can sometimes be tricky to put acrylics on top of oils, so if you’re not sure, try to keep them separate if possible.
And finally, note that Stand By was done during the hot summer of 1993 after work and at weekends – and it took me 6 weeks to do - that's including lots of drying time plus a week of waiting for it to dry to a full cure before I added a varnish coat.
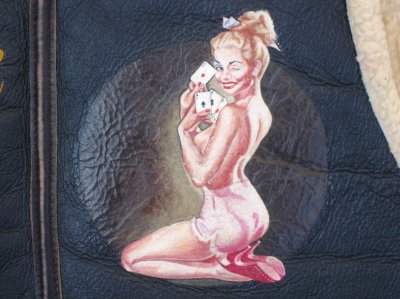
Another example here is the pin-up girl by K.O. Munsen that I painted on my ELC C-3 and I entitled “Playin’ Jane”.
And we'll look more closely at that and other works before we get to putting brush-to-leather and truly committing ourselves ...
End of Part 3.
In WW2, the nose and jacket art works were done with whatever paint was to hand on the base. This was usually enamel or similar oil-based paint and in limited supply and so there wasn't a lot of range of colours. And not every base had a competent artist - the job sometimes just fell to whoever showed even a glimmer of talent, and so the quality of works varied enormously from the rough and basic through to the truly amazing and artful.
The ladies at Hibbert Bros. told me that I could use artist acrylics and/or artist oils. Now, back then, this was all new to me. I was a seasoned aircraft model builder, having made models all my life since I was 6, but had only ever used enamels (hand-brushed and airbrushed) - so I felt really quite daunted by this.
"Don't worry. You can do this", they said. And you can too.
Artist acrylic paints are easy. They go on smoothly and set very quickly and can be over-painted in minutes. Being water-based, any mistake can be removed quickly with a wet cloth or Q-Tip. Note that acrylic paints are sold in varying degrees of quality; namely student grade and professional grade. Student grades are for students who typically have less money to spend, so the quality of the pigments and fillers is reflected in the lower price. My advice: Get the professional grade as this is a design you only intend on doing once and it should be the best it can possibly be and it's a precious A2 we're talking about here! Invest in the best.
You will first need to paint a white base on the jacket in the shape of your design - to get the colours to stand out and work properly. You could use gesso (in the same manner as artists use it on canvas) as it is white and flexible, but a simple white acrylic base will work just fine and is what I use.
A word on additive mediums:
You will need to add Tension Breaker - this does a couple of things: it lowers the surface tension of the acrylic paint and improves the bond to the fabric and it also helps the paint to flex - so it won't crack as the jacket bends. I used one by Rowney back then. These days, as far as I know, only one company (Matisse Derivan) in Australia still makes it under the name of Surface Tension Breaker and I got mine from Oz online. Windsor & Newton also makes Flow Improver and it too is designed to help the acrylic flow (as the name says!) and help you get a nice, neat "hard edge" with the acrylic paint - and I once called the rep at the factory and told him about my old Tension Breaker and he said it was the same thing and the same formula.
Another medium to consider is Retarder. As I mentioned, acrylic paints set quickly which can be a bonus - but depending on the day and what you are doing, they can set a mite too quickly - especially if you are trying to take your time and blend some nice flesh tones or something similar. Retarder is a medium that slows the drying and allows for some extra working time.
Artist oil paints work very well too but, whereas the acrylics set in minutes, oils can take a week. Yes, a week. This is great if time is not important as they are immensely forgiving and you can easily remove mistakes with a Q-Tip or soft cloth and adjust your work as you go and review/correct it over days. If you need to speed certain colours up, you can add some Japan Drier which halves the drying time to a few days, but do be sure to use this in a well-ventilated area as it's a bit toxic and harmful to the ol' lungs. Oils have equally good permanence too.
If you're doing a pin-up girl and want nice, blended flesh tones with no brush marks, oils would be a good choice. And that’s where oils are useful – they allow you time to work and get nice blends whereas acrylics set too quickly.
Use a tension breaker of course – and in this case, you’d want something like Oil Painting Medium I by Grumbacher.
“How do I choose what paint medium I should use?” I hear you ask.
Well, that depends on what you are wanting to do.
Let’s look at my very first work “Stand By” as an example:

The lettering was done in acrylics and they’re very opaque and go on well, there's no blends of colours required and are ideal for this - but the pin-up girl and smoke was all done in oils.


Note the flesh tones of the girl and how they are nicely blended from the highlights down to the shadows. Oil paint allows you lots of time to blend paint nicely and erase any mistakes or brush strokes. Being more translucent, you may need to use a couple of coats of oil paint flesh tones, but that’s okay. Take the time. The result is worth it! Begin by getting a basic flesh tone paint colour and putting that down as a base and letting it dry. Then work the other flesh tones (cool and warm crimson tones, highlights, shadows) on top. Flesh tones are tricky but oils will allow you to practice and develop your skills as you go. There are also kits of flesh tones in hobby stores and they will give you an idea of the colours you should emulate, as well as some good how-to guides in model forums.
Note also too the smoke – you will notice that it goes from a darker blue-grey at the bottom corner of the work and changes gradually and seamlessly to a lighter blue-grey as it gets higher and the perceived light changes. Again, it’s a seamlessly smooth blend of hue and value which could only be done with oil. Acrylics would set far too quickly on you and make hiding brush strokes very difficult. St. Paul’s cathedral and the bombed out buildings were also done in oils.
The Messerschmitt Me- 323 “Gigant” and spotlights were all done in acrylics. The white cloud is simply the white base coat.
Note that you can paint oil paint on top of acrylic paint but it can sometimes be tricky to put acrylics on top of oils, so if you’re not sure, try to keep them separate if possible.
And finally, note that Stand By was done during the hot summer of 1993 after work and at weekends – and it took me 6 weeks to do - that's including lots of drying time plus a week of waiting for it to dry to a full cure before I added a varnish coat.
Another example here is the pin-up girl by K.O. Munsen that I painted on my ELC C-3 and I entitled “Playin’ Jane”.

And we'll look more closely at that and other works before we get to putting brush-to-leather and truly committing ourselves ...
End of Part 3.
