dinomartino1
A-List Customer
- Messages
- 338
- Location
- Perth, Australia
Following on from this thread, I have finished my redye.
a2-re-dye-advice-needed.86899
So why did I do it, I have been after an A-2 that actually fit me properly for years and I was very lucky to find this Buzz Roughwear for $US217 including postage on eBay., I would not have done this to jacket I had paid the right price for it. The tan colour was not for me so I was willing to take a chance and try a redye.
I was not trying trying to recreate any type of ww2 depot redye look, many of you may dislike my colour choice but I'm happy with it.

This was the dye I used, Fiebings mahogany alcohol based. I put the dye in a cup to make it harder to knock over when I was dyeing.

The knits and waistband where removed as I was replacing them with rust knits.
I used painters masking tape in any areas where the lining and leather met and the zip.
I used two layers of tape and had no issues with the dye going through the tape. but remember to use gravity to help you so when doing the collar and other tricky areas hold the jacket upside down from where you are dyeing so the dye runs away from the liner. I used fine brushes for this.
Remember the dye is like water.

Next I cleaned the jacket with acetone, let it dry out and the started.
If you use a brush get something decent or bristles will fall out when you dyeing.
Forgot to add precautions when using acetone.
If you use it be in a well ventilated area and wear gloves and eye protection the fumes are vey flammable, it will dissolve latex gloves so don't use those.


On the picture below the light coloured areas are excess dye you have to buff them off with a cloth as well as the whole area you have done between coats, be prepared for a lot of elbow work, Humidity etc.will play a part in how long it takes to dry and you will need a lot of cloths as a lot of dye will come off.
I knew it would be hard as I was dyeing over a light colour, you will get the feel for it as you go, a darker jacket would be way easier than what I had to do. Remember as I said before it is like trying to paint with water the dye mill run and pool around the creases in the jacket, It's best to start with a little dye on the brush and see how you go, also be wary of the dye on the brush it's very easy to splash around.
It's also like ink to paper the first spot on the jacket the brush or rag touches is instantly going to soak up more dye than the areas around it.
You can use rubbing alcohol to lighten areas if you want a worn look though I didn't.


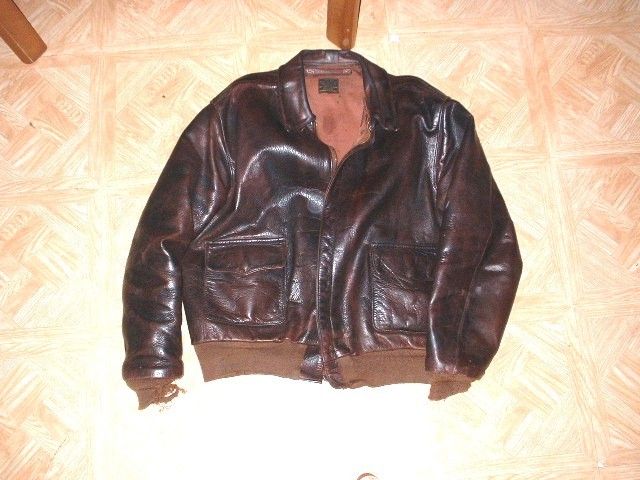
Pic below, more coats will darken lighter areas like the sleeve on the pic above, but it will never be perfect but that how I like it, I think you would need to use a spray gun for a perfect match to avoid the first spot you touch always being darker but if you where doing a darker jacket it would be a lot less visible.

New knits and decal.

Finished

a2-re-dye-advice-needed.86899
So why did I do it, I have been after an A-2 that actually fit me properly for years and I was very lucky to find this Buzz Roughwear for $US217 including postage on eBay., I would not have done this to jacket I had paid the right price for it. The tan colour was not for me so I was willing to take a chance and try a redye.
I was not trying trying to recreate any type of ww2 depot redye look, many of you may dislike my colour choice but I'm happy with it.
This was the dye I used, Fiebings mahogany alcohol based. I put the dye in a cup to make it harder to knock over when I was dyeing.
The knits and waistband where removed as I was replacing them with rust knits.
I used painters masking tape in any areas where the lining and leather met and the zip.
I used two layers of tape and had no issues with the dye going through the tape. but remember to use gravity to help you so when doing the collar and other tricky areas hold the jacket upside down from where you are dyeing so the dye runs away from the liner. I used fine brushes for this.
Remember the dye is like water.
Next I cleaned the jacket with acetone, let it dry out and the started.
If you use a brush get something decent or bristles will fall out when you dyeing.
Forgot to add precautions when using acetone.
If you use it be in a well ventilated area and wear gloves and eye protection the fumes are vey flammable, it will dissolve latex gloves so don't use those.
On the picture below the light coloured areas are excess dye you have to buff them off with a cloth as well as the whole area you have done between coats, be prepared for a lot of elbow work, Humidity etc.will play a part in how long it takes to dry and you will need a lot of cloths as a lot of dye will come off.
I knew it would be hard as I was dyeing over a light colour, you will get the feel for it as you go, a darker jacket would be way easier than what I had to do. Remember as I said before it is like trying to paint with water the dye mill run and pool around the creases in the jacket, It's best to start with a little dye on the brush and see how you go, also be wary of the dye on the brush it's very easy to splash around.
It's also like ink to paper the first spot on the jacket the brush or rag touches is instantly going to soak up more dye than the areas around it.
You can use rubbing alcohol to lighten areas if you want a worn look though I didn't.
Pic below, more coats will darken lighter areas like the sleeve on the pic above, but it will never be perfect but that how I like it, I think you would need to use a spray gun for a perfect match to avoid the first spot you touch always being darker but if you where doing a darker jacket it would be a lot less visible.
New knits and decal.
Finished
Last edited:


